This walkthrough will detail everything you need to do, step by step to complete the game and get the achievements. Feel free to take time to explore and enjoy the game as you go. There are a lot of notes and datapads in the game that you can read and examine, but they are not specifically mentioned in the walkthrough because they are unnecessary for any of the achievements. They add a lot to the atmosphere of the game, however, so I recommend examining on the first pass.
Once the opening scene begins, head forward to the altar, pick up the tape and put it in the player to start the game. Watch and listen to the introduction. You are Alex. Your sister is Elsie. The watcher instructs us to go fetch a Grasp (whatever that is) from his tower.
Now we actually begin the real game. Start by turning around.
Getting the Grasp
Head forward. Instructions indicate you can use the trigger on your main hand (right by default) to perform telekinesis with that hand. Use it to clear the path on your right of debris. Head to the other side. Before you approach the closed portal, note a cube on the ground near some other debris. You'll want to use the gauntlet to move it closer to the portal. On the left side of the portal is a square receptacle. Manipulate the cube so it is in the receptacle and it will click into place. Then use your power to grasp the cube and turn the outer circle of the door clockwise. This will open the portal, allowing you to move forward and into the next section.
Head forward onto the platform with the red light on the floor. when you get close, a hologram will rise up from the floor, showing a spinning thing. Put your gauntlet into it to start the first Gauntlet puzzle. All of these puzzles work basically the same way. There is a small hexagonal ball which tracks the motion of your hand. You need to move the ball from the starting place to the end of the holographic field. If the ball hits the edge, it will fail and you have to start over. These will get successively more difficult, but this one simply requires you to move the ball straight down, triggering an elevator (which goes in the direction you moved the ball). Elevators are always simple up/down movements.
At the bottom of the elevator go forward to trigger and solve a similar holographic puzzle to open the door. Door locks are more complicated then elevators, but only have to be completed a single time (once a door is unlocked, it remains unlocked and will open automatically when you approach it for the rest of the game). Head into the Coliseum. Watch the hologram of Elsie. The broken pillar next to where she was has the first cassette tape (Cassette #1: "Amazing") on it. Pick it up and listen to it using the player in your backpack.
Move forward and you'll get another holographic memory. Explore the arena if you wish, but we'll be coming back here later. One thing you might do is practice with the gauntlet and throw the corpses around until the limbs fall off (yes, disgusting I know). There is an achievement for doing this 44 times, so you might as well start early and bash around every corpse you find; I won't bother pointing them out. We can farm it later if necessary and every time you return to this room (whether from a saved game or by going through a load screen) all of the corpses and broken stone fragments are reset to their original state, allowing you to bash them around again. You may also note the hermit-crab like creatures wandering around; you can pick one up for closer examination if you want. These were named "Hermites" by Elsie.
Head to the door opposite the one you entered, beneath the legs of the giant statue. We get a slightly more complicated puzzle. The tube you need to move the ball through is larger, but there are red plates blocking parts of it. If you try to put the ball through one of these it fails and you have to start over, so maneuver the ball through the tube, avoiding the plates to open the door. Head in and you'll get another Elsie hologram.
On the right side of the hallway is a photo left by Elsie (Polaroid #1: "My Friend Hermie") and a book (Book #1: "Fall of Ember"). Make sure you pick both of these up and examine/read them. You can read the book by grasping the glowing ball on its cover and pulling, which will reveal a couple of pages you can rotate through. Read every book we find. Past this on the left is a cassette tape (Cassette #2:"Magic Space Books") and another book (Book #2: "Beast of Burden"). There is also a corpse in here whose limbs you can abuse if you want. Head to the door and do the puzzle to unlock it.
Enter the first transportation room. After another holographic memory, first look to the right of the entrance to find a tent of sorts. Inside is a cassette (Cassette #3:"Blast From the Past") and another book (Book #3: "My First Transport"), as well as two photos (Polaroids #2-3: "Home Sweet Home" and "Remember"), some drawing Elsie made, and a playing radio you can pick up if you want.
Lie down on the sleeping bag in the tent to unlock your first achievement:
Head back into the main part of the room and solve the Gauntlet puzzle on the chest by the tent to reveal a sphere. Use your telekinesis to put the sphere in one of the sockets at the front of the room (up high), then head to the chest on the other side of the room and repeat. You've now unlocked the map. Step to the center of the room and it will rise from the floor. You can grasp and rotate the planet. You'll see three labeled areas. "Transport and Culling Ground" is where you are now. The other two are "Queen's Palace" and the "Tower of Cogs." To go to one of these, grasp the glowing ball by it and pull (just like with the books) to reveal the map of that area. You can then indicate where you want to go by pointing to a hexagon on the map with your other hand and holding it there until the outer lights fill. We were told to go to the tower to get the grasp, so let's go to the Tower first. You'll now meet the transport...Elsie did warn you. Enjoy the holographic memory while you travel.
The Tower of Cogs
You end up in a transport room much like the one you left. After the holographic memory is done you will also automatically unlock:
A cassette tape (Cassette #4:"Holy...Smokes") is on a shelf to the left near the door and a photo (Polaroid #4: "Hermie is Hilarious") is on a large gear just to the left of the map if you are facing it (facing away from the door).
On the right side of the door is the first gear puzzle, with another photo (Polaroid #5: "Think Fast!!") on it. The gear puzzle has lever on the side. When you pull it, three things happen: (1) a bunch of rods of different shapes pops out of the puzzle. (2) A bunch of gears with matching shapes appears out of slots at the bottom. (3) A timer starts counting down. The goal is to put gears on all of the rods before the counter runs out. It is not that hard with a little practice, but there are a few of these to do and they will get harder. For the more difficult ones you almost certainly have to use both hands in order to do it so get used to grabbing and placing. If you fail to do it in time, all of the gears fall and you have to start over.
Forward into a hallway with another hologram and another gear puzzle. Forward into a corridor with two holograms...Elsie in front of you and a reddish one in a room ahead you cannot enter yet. Follow the corridor around to the left, then back right into a lab/workroom. Ignore the gear puzzle on your left for now. On the chair in front of you is a book (Book #4: "Wizgog Chamber") to read. On the outside edge of the tank with the Wizgog (the flying-insect thing) is a cassette (Cassette #5: "Grasp and I'm Gonzoo") and another photo (Polaroid #6: "Poor Thing :( "). To your right is a handle/lever (skip this for now), then a window with a bunch of equipment, then two more books (Books #5-6: "Notes on the Reach" and "Notes on Security") and yet another cassette tape (Cassette #6: "Scary Weirdo Guy"). Listening to it reveals (if you have not already figured it out) that the Watcher from the beginning of the game (and the end of the previous game) is named Sebastian.
Pull the lever by the cage to get a small hologram of Sebastian.
Before you leave, we'll pick up two more achievements. Outside the window you can see a bunch of flying wizgogs. In front of the window is a slingshot like device attached to the desk. If you pull back on the slingshot it shoots a ball of energy. Use it to kill all of the wizgogs flying outside. Eventually, once you've killed all of them, a single giant wizgog will appear. Keep shooting it over and over again and once you kill it, you'll unlock:
Right next to this area is a large glass container with a captured wizgog in it. Pulling the lever next to it will shock it. Repeat this over and over again and you can eventually kill it to unlock:
Once you are done killing wizgogs, there are two gear puzzles here. The one by the closed door all lit up in red cannot be accessed yet, so ignore it. Head to the one you passed when you came in. Solve it (six different shapes, so a bit more difficult) to lower the bridge. Head across it and through two doors to see Elsie by a machine talking about needing to charge something. On the edge of the machine in front of you is a book (Book #7: "Shatter the Illusion"). There are two more on the bench on the right (Books #8-9: "Notes on The Injector" and "Notes on The Engine").
There are a few other things you can interact with, but for now, head to where Elsie was and see a sort of hexagonal-cut stone (this is a battery). Pick it up and put it in your backpack. Listen to the Watcher hologram, then head back to the transportation chamber you arrived in and use the map to travel to the Queen's Palace.
The Queen's Palace
Before leaving this new room, open the chest on the side to reveal a book (Book #10: "Below Our Feet") to read. Then do the gauntlet puzzle to go through the door. Repeat at the next door (hardest puzzle so far). You now enter the Ember Engine chamber (looks like a giant temple). There is a photo (Polaroid #7: "Hermie's New Home") on your left before entering the main room. The last photo (Polaroid: #8, "Ember Temple") is sitting in a carving on the right, facing you vertically rather than lying horizontally, just before you enter the main room--this is the hardest Polaroid to find. Picking it up and looking at it should unlock:
Head forward. There is a book (Book #11: "Temple of Ember") on the left on the third pew. There is another book (Book #12: "Power for All") on a bench on the right side of the room, with another cassette (Cassette #7: "Power 4 Dummies") next to it. And there is another book (Book #13: "The Ember Engine") in the back left (relative to where you entered) part of the room. Feel free to explore a little, but to make things easier do not play with or move the floor yet; if you do you will need to realign it so the path from the center to the front is connected in a straight line. The next step is to head to the pedestal directly beneath the statue and put the hexagonal power supply you got from the tower into it.
You will see a hologram of Elsie, then one of Queen Sarah. Head back out toward the way you came in and you will discover an elevator platform has turned on just past the pews (if you happened to look back that way immediately after putting the dead battery in the socket, you would have seen the elevator lower from the ceiling). Use the elevator with the simple up/down gauntlet puzzle to go to the balcony. On the left (facing into the temple), is another book (Book #14: "Melodies of Life") and the last cassette tape (Cassette #8: "Holograms are RAD"). Listening to it will unlock
On the right is a second book (Book #15: "Three Crystals") and a purple crystal. Pick up the crystal, then head toward the front of the balcony where the organ will rise in front of you.
Put the crystal into the organ. You now get a music memory puzzle. Colored glowing lines will appear in the air. One will vibrate. Put your hand in the color stream to repeat the sound. Then two will go. Repeat, etc., until you've done enough to trigger the device. Watch the machine in front of you come alive. Head back down the elevator and toward where you placed the battery to watch a hologram between Sarah and Sebastian. Followed by the Voice of the Heart asking you to help it.
Pick up the battery, then head back to the transportation room to travel back to the Tower of Cogs and the room where you first found the battery (the "Solar Engine"...you can now go straight there from the transport chamber since you've visited it once before). You will see another Elsie hologram in the transport room, and a second conversation between her and the transport giant as you travel.
Put the charged battery back where you found it. Watch the holographic memory, then put your off hand (left by default) into the machine to be given the Grasp. This will unlock the story achievement:
Watch another Elsie memory, then head back to the Culling Grounds and up to the place where you first began the game ("Passage to Starseed" on the map), watching another Sebastian and two more Elsie holograms on the way. Once you get there, take the elevator up and head back across the bridge to where you started.
You will see one last holographic memory of Elsie, then she opens the door where you started. Head there and use your Gauntlet to power the Starseed. Sebastian tells you to go get more power, then does something to charge the grasp you just obtained. Functionally, you can now do telekinesis with both hands which allows you move heavier objects.
Getting Power from the Engine
Your new instructions are a bit vague, but you need to find a new power source for the Starseed. The power in the grasp should allow you to do it. Head back toward the culling grounds, moving the large stone out of your way with a two-handed power grab, then take the elevator down and back to the culling area.
At this point we are going to pause following the main plot to pick up a few more achievements (these can be done later, but let's knock a few easy ones out of the way). If you haven't unlocked the achievement for doing so already, throw the corpses around to knock off their limbs. If the achievement still hasn't unlocked, try going up and then back down the nearby elevator to reset and keep repeating until you unlock:
There are two achievements for stacking the giant stones, one of which we can get now (the other is technically possible now but will be easier later). The two achievements are called "Tower Builder" one Small and one Large. The difference is the height of the tower. To get the first, place one of the long pillars upright on its end, and then place a second piece of stone on top of it. That should be enough to unlock
(I actually got it by building a Stonehenge like structure with two tall vertical pillars next to each other and one tall one sideways across the tops).
If you look up above you'll see a flock of wizgogs flying around. For another achievement pick up one of the large flat stones and try to get it high enough in the air to hit and kill one of them with it. Doing so will unlock:
If you do not get this now, there will be an easier opportunity later. One last achievement to pick up right now. If you've been throwing the bodies around, do one more elevator ride to reset the room, then move all of the bodies in the Culling Grounds into the balcony (to the right of where you enter from the Starseed, to the left if you enter from the Transportation Chamber). When all of the corpses are placed in the balcony you will unlock
If it does not unlock you've probably missed one. I believe there are nine total, one of which is already on the balcony. None are that hard to find, but a few are slightly hidden. One corpse is on the top of an unmovable pillar. Two are underneath fallen (movable) stone slabs. A few may be hard to spot on the tiered galleries around the area (the last one for me was in the very back row of the tier to the right of the balcony, hidden in a shadow up against a pillar on the back wall). The corpse in the hallway between the culling grounds and the transportation chamber is not needed for this achievement. If you cannot get it to unlock, you can always reset the room and try again.
When you're done with these achievements, head to the transportation room and return to the Tower of Cogs (the workshop area where the captured Wizgog was). Use the powered grasp to unlock the gear puzzle and solve it (harder than the others due to less time). This unlocks the study where you get another Sebastian hologram. There is a book in the corner (Book #16: "Notes on Crystals"), one under the bench (Book #17: "She Will Fall"), and one slightly hidden on the bench just above the second (Book #18: "Notes on Flowsparks").
Solve the last gear puzzle, the hardest yet. Only three types of gears, but very little time so definitely use both hands. After this you will unlock both the safe and:
Get the gear out of the safe and store it in your backpack, then head back to the solar engine. Watch a Sebastian hologram, then put the gear you into the panel on the machine right in front of you as you entered the room (next to the long lever). Watch yet another Sebastian hologram, then observe the machine start to come together. You now need to find a power source for the machine. Before going on, though, you may have noticed a body fall from the ceiling. Head around to the other side of the machine, grab the body and toss it through the open doorway into the pit in front of you to unlock:
Now go to one side of the machine and you will see a lever you can pull to open a panel and reveal a dead power supply with a water (or food) symbol behind it. The other side has the same thing with the other symbol. Head back to the Ember Engine in the Queen's Palace to see a Queen Sarah hologram.
Now, look at the giant boulder lying on the floor. Use both hands to lift it and place it in the hands of the giant statue above where you placed the battery for charging. The status will spin to reveal a chamber you can enter. Go inside and read the book on the left (Book #19: "The Arbalest"). You now have three paths in front of you. This is your only opportunity to explore this part of the game world; it will be closed off to you once you've completed the task you are here for, so feel free to explore. The center path is a dead end while the outer two loop to the same spot, so choose either side hallway. In the room you enter is an elevator, but before you take it note that there are two tombs you can "read" up here ("The Thirtieth, King Michael" and "The Forty First, Queen Jeanine"). Reading these tombs is optional and unnecessary for achievements, but adds to the lore of the game.
Before you activate the elevator, a note about an achievement. When you go down the elevator you will quickly enter into a fairly dark maze. There is an achievement for navigating the maze without using the flashlight. In this walkthrough I am assuming you will get that achievement on the second playthrough, using this one to explore more leisurely and learn the layout. It is up to you.
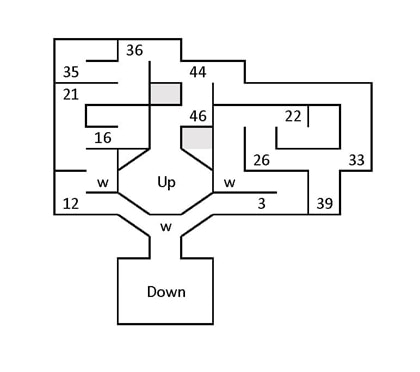
Take the elevator down to a new room with two more readable tombs. Exit the room to enter a small maze, with twelve more readable tombs. Your goal is to get to the center room you can see through the opening when you first enter the maze. The maze loops onto itself, so you can go either left of right. The maze is not too hard to navigate; using the flashlight in your backpack helps (remember the earlier note about the achievement). You might want to spend some time learning the general shape of the maze since you will want to be able to navigate it quickly and without the flashlight in the second playthrough. Here is a general map of the maze. The letter "w" refers to windows. The numbers refer to the numbered, readable tombs.
When you get to the center of the maze, ride the elevator up (you cannot come back down). There are two more books to read here (Book #20: "Starseed Jumps" and Book #21: "The Starseed") and two more tombs. Then look at the glowing ball in between the books and tombs. Grasp it with both hands (where the handprints are) and lower it and hold it there and you'll unlock an arbalest on the back of your wrists (a glowing ball on each). If you grasp the ball with your other hand, pull back and let go, you essentially have a super-powered slingshot.
Walk toward the exit and the door will open. When you reach the chamber under the statue the door will close behind you. Use the arbalest to blow out the glowing lock on the door you originally entered, then again to knock down the key stone in the ceiling above you. Put the keystone in the door, then grasp and move it to exit back into the ember engine. Head to the transport chamber and to the culling grounds, watching another conversation between Elsie and the giant on the way.
When you get the culling grounds, pause for a moment, there is a missable achievement right now. You probably noticed earlier that there is a door beneath the balcony that you could not enter. You can unlock that door now, but there is an achievement you need to get before you completely unlock it or you have to start the game over. Above the door is a stone lock, like you saw when exiting the tomb area. Use the arbalest to blow this open, revealing a basket like shape. On the ground nearby is a sphere. DO NOT PUT THE SPHERE IN THE BASKET YET. Instead, go find one of the wandering hermites, pick it up, and then toss it into the "basket" (I found underhand tosses worked better than a proper basketball shot, but do whatever works for you). Once the hermite lands in the "basket" and moves around a little, you should unlock the very missable:
Once that unlocks you are free to put the sphere into the basket to activate the door. Before heading in, though, we will knock out some other achievements. Also note that if you failed to get some of the other achievements mentioned earlier when we were in this room, now is a good time to complete them all.
Gather ten corpses and put them in a pile. You will need all nine from the Culling Grounds, including the one on the balcony, and the tenth corpse in the passage between the Culling Grounds and the Transportation Chamber. Once you have them all in a nice pile, shoot the pile with the arbalest to unlock:
The next one is slightly tricky to explain. Look at the giant statue whose legs you walk through to head toward the transportation chamber. You want to pick up one of the hermites and place it on the ground in front of, but between the legs. You then want to shoot the ground in front of the hermite with the arbalest; this will launch the hermite up into the air. You are trying to more or less get him to go into the area beneath the statue's legs. If you do it right, the hermite and everything else in the chamber will start to float and you'll unlock
Once you've done this, travel somewhere else and then back to reset the room and stop the floating. Now advance the story a little bit, but we'll still be aiming for more achievements before leaving. If you haven't done so already, unlock the balcony door, including another gauntlet puzzle, then head inside and take the elevator up. Head out to the balcony. Open the chest on the left to reveal two books: "Tusk, the Unstoppable" and "Sebastian's Cull"). Reading both of these should finish off the books and unlock:
for reading all of the book, as well as
for collecting all of the lore in the game (cassettes, Polaroids, and books). Open the chest on the right to find another book (this is "The Arbalest" and a duplicate of one you read earlier) and the blue crystal. Store the crystal in your backpack and then observe a holographic memory from Sarah, during Sebastian's cull. Now that we have access to the balcony, we're going to unlock a few more achievements. If you did not get Fly Swatter earlier (killing a wizgog with one of the stones), it is easier to do from here because you are higher up. More importantly, you want to make sure you kill the entire flock. Watch it for a few moments; if you haven't killed any, there will be 11 wizgogs flying across the screen in a set pattern in different directions and at different heights. The lowest height is the one where they are flying more or less directly toward the balcony from the opposite side. This is the easiest time to try to kill them. You want to try to get all 11. With a bit of timing and luck you can probably get most by swinging the stones around; I managed 9 of 11 this way. For any others, just try to shoot them with the arbalest. It takes some patience and a bit of luck, but eventually you should kill all 11 unlocking:
Note that if you leave the culling grounds and return, they are all alive again.
One last achievement before we leave here. Earlier we got the Tower Builder - Small achievement. Now we will try to get large. This one is logically simple, but functionally difficult. You need to build a huge tower as high as you can go, using most of the stone elements in the area. There are four full height pillars (two are stuck above the floor of the culling ground in rubble and have to be maneuvered out with both hands; one of which, in the back left, I was only able to reach with some effort from the corner of the balcony). There are four half-pillar pieces. There is one large slab and a number of smaller slabs. To unlock this I had to get all four tall pillars stacked vertically on one another, the large slab standing vertically on these, all four half pillar pieces on top of that, and a couple of the small slabs stacked on those (but flatter, like a table top). This was challenging to say the least, as it takes some practice and effort to even get the pieces up to that height, let alone set them on top of the pile without knocking half of it over.
Some general hints:
- Move all of the items over to the ground near the balcony before starting to stack.
- Start with the tall pillars and the largest flat stone as these all require both hands to maneuver. I found it easier to place the flat stone in the middle of the stack rather than on top of the four pillars, because it was a bit harder to maneuver and slightly less stable
- Try to place each piece as gently as you can; wait a moment or two to make sure the stack isn't about to fall before moving onto the next piece.
- Once you get the first 3 or so pieces stacked, you'll probably want to move up to the balcony to do the rest as the extra height helps you reach higher
- You want to do all of the two-handed pieces first, because that way you are less likely to accidentally jerk on one with a single hand grab when you're maneuvering the smaller pieces near the top
- One trick for getting height with the smaller pieces is to grab in one hand and extend as high as you can. Take your other hand and hold it low and close to your body, then trigger the grip to try to grab it from there. Let go with the first hand, then when you raise the second you should move the object that much higher. Alternating back and forth like this allows you to get some height pretty quickly, but be careful that you are targeting the right item with the lower hand and you don't accidentally pull on a piece already stationed on the tower.
These and the previous wizgog achievement are probably the two most difficult to get. Patience and practice are what it takes. Remember you can reset the room by leaving and returning if you have to (I once knocked over my tower and had a piece land on the roof of the balcony where I could no longer find a way to reach it). At some point when you've got most of the stones stacked vertically (high enough to hit the wizgogs) you should unlock
With that out of the way, the rest is a lot easier.
Head back down the elevator and into the grounds to watch Sebastian's take on the cull, then head to the Queen's Palace and the Ember Engine. Head up the elevator to the organ, place the blue crystal in the machine to reveal five colored musical streams and follow the music/color pattern to turn the engine back on. Before you leave, we can sneakily do one more achievement here. After you complete the required music, the colors fade to dull orange and you may note there are now seven such lines. You can still play notes in them by interrupting them with your hands, however. If you start with the leftmost one as #1, play the following pattern: 1, 5, 4, 2, 3, 1, 2. If you do it right you should unlock:
Head back down the elevator. You need to reroute the power to the food and water stations. Let's do food (the one on the left first). Use your power to lower the food pillar by grasping the keystone in it. Shoot the lock out of the water pillar with the arbalest. Knock the stone out of the food pillar and move it in the water pillar and lower it as well. Knock the stone out of there, blow out the lock on the ring on the floor, and move the stone to the ring. Both rings should now have stones in them, allowing you to turn them. You need to orient the rings so power runs from the center to the food pillar. Once it's powered, you can do a gauntlet puzzle on it to unlock the food item. Pick it up and put it in your pack and get a hologram of Sebastian and Sarah, followed by another enigmatic Heart message. Reorient the rings so power now goes to the water pillar, do another gauntlet puzzle, and watch another hologram memory and message from the Heart.
Head back to the Solar Engine in the Tower of Cogs. Place the food and water power supplies in the appropriate parts of the Solar Engine to turn it on and unlock:
Pull the big lever at the front where you entered the room to lower the entire platform, listening to Sebastian. When you get to the bottom, head out the door to a windy wasteland. Listen to Sebastian make a speech. While that's going on, you can find the red crystal hidden inside the leg of the corpse chained to the pillar on the left. Grab it and store it in your backpack. When Sebastian is done, head back inside and pull the lever to head back up. Return to the Queen's Palace and the Ember Engine one more time, picking up some more holographic memories on the way.
Point of No Return
If there are any earlier achievements you haven't unlocked already, you need to do them before using the red crystal, or wait until another playthrough. When you are ready to proceed, head up to the music balcony one last time, put the red crystal in place and play the tune as before. Use the newly available handles on the left and/or right sides of the room to turn the entire room in front of you upside down. Listen to the Heart, then head onto the platform and do three more gauntlet puzzles of increasing difficulty, unlocking
After this you get to meet the Heart and listen to its history. You find yourself automatically back at a transport platform. Use the gauntlets to free the Heart, then watch the heart reunited with the Emberstone. You will then find yourself back near the Starseed chamber. Watch a final holographic memory, move onto the Starseed platform, use the gauntlets to activate it, and find yourself traveling to the next destination/game, and unlock the achievement:
If you followed this as described, you should have unlocked 24 of 27 achievements. The last three will be picked up in our second playthrough.
Find anything you think is wrong with this walkthrough? Help us fix it by posting in its
Walkthrough Thread.
This walkthrough is the property of TrueSteamAchievements.com. This walkthrough and any content included may not be reproduced without written permission. TrueSteamAchievements.com and its users have no affiliation with any of this game's creators or copyright holders and any trademarks used herein belong to their respective owners.