Broken Age

Welcome to the Broken Age walkthrough. Here we will be guiding you through completing all of the puzzles and talking to all of the necessary characters to get through the entire story. This game will need two playthroughs to unlock all of the achievements. First we will be completing the story in the quickest way whilst still gathering 43 of the game's 45 achievements. The second playthrough will be a speedrun where we complete the game in the most efficient way possible to earn the final two achievements.

A normal playthrough will take you 8-10 hours if solving all of the puzzles yourself. With the use of this guide, we've got it down to 7-9 hours for the first playthrough and less than an hour for the second. There is only one difficulty, so there is no need to worry about any difficulty-based achievements. While none of the achievements are buggy either, there are 23 missable achievements that will cause you to either start another save or reload an earlier manual save to be able to earn them.

Hide ads

When you reach the start menu for the game, you will be faced with four options:

  • Continue - you continue the game from your last auto or manual save.
  • New Game - start a new game in any of the eight save slots
  • Load Game - load any of your available saves
  • Options - change the control configuration, sensitivity of the cursor, volume, and language, and toggle subtitles on/off. You can also view the credits here.

As mentioned above, the game gives you eight save slots. One will be taken by the game's auto-save function, giving you seven slots to use to make Manual Saves at really important times. I'll be letting you know when you need to make a Manual Save in case something goes wrong, but use the slots at other times to reduce the amount of back-tracking when you need to take a break. You can create a Manual Save by pressing the Escape button and selecting Manual Save from the menu options at the top of the screen.

Hide ads

If you have to reload a Manual Save to retry a part of the game that should award you an achievement, DO NOT enable auto saves. If you enable auto saves and then fail to meet the requirements for the achievement, the game will already have saved over your file with your failed progress. At this point, you will either need to load an earlier save or start another save file altogether. Once you have met the achievement requirements, make another Manual Save. You then have two choices.

  1. Continue without autosaves, making sure to make a Manual Save file at regular intervals.
  2. Quit out of the game, load up your latest Manual Save and enable auto saves so that the game will save your progress for you again.

Personally, I preferred the second option because then there was little chance of losing much progress if I made a mistake or the game happened to crash.

Although the control configuration can be changed, I'll be using the default configuration for the purpose of this walkthrough. In this game you will meet many people, all of whom have interesting things to say. You don't need to listen to all of their conversation options -- you can press Space to skip the dialogue and choose the next option. You can also press Space to skip most (but not all) of the cutscenes. When travelling from area to area, clicking the left mouse button twice can transition between locations much quicker.

I will be using specific formatting for this walkthrough to make it easier to see what is what. Bold text represents items that can be added to Shay/Vella's inventory. Underlined text represents people that you will meet. Text that is in "quotation marks" represents dialogue options. Locations will be in Bold text and Underlined. Throughout Shay's Acts, there will be numerous occasions where Shay will need to use the Spoon or Grabbin' Gary on different objects or people to earn two achievements. These occasions will be highlighted in text boxes.

I'll also use screenshots to help with locating objects. Useful objects will be circled in red. Useful people will be circled in blue. Grabbin' Gary locations will be numbered in blue. Spoon locations will be numbered in red.

Finally, it makes no difference whether you choose to play as Shay or Vella first during Act One. You can even swap between the two at any time. This is the same for Act Two. I will be starting with Shay first and playing Vella's story second in both acts, but it is completely up to you in which order you choose to play the characters.

Let's begin the story.

Click on Shay to begin his half of Act 1. When Mom appears in the Orb, click on the blanket to see a cutscene that takes Shay into the Kitchen.

Refuse all of the cereals that the computer offers to Shay. There are 12 in total and they end with SPLARGH. Once you have refused SPLARGH, the computer will force Shay to have a bowl of this cereal anyway.

Hide ads

Do not pick up the Spoon just yet -- let it talk to you for a while. After it has said "Is something wrong?" and has panicked for long enough, Shay can then pick it up.

Use the Spoon on the bowl of cereal to see another cutscene. When given a choice of missions, pick "Better suit up and investigate that foreign body".


Foreign Body Mission
Walk over to the right side of the screen to see the foreign object. Click on the Plant to receive a Parcel.

Shay will return to the Bridge where he must pick another mission. Choose "We have to defend the Friendship Circle!"


Friendship Circle Mission

Before you do anything to complete the mission, use the Parcel on Shay to open it and reveal Grabbin' Gary.

Use Grabbin' Gary on Shay (1), the Beanbags (2), any of the three sets of Controls (3), and the Knitted Creature (4). Open your inventory and use Grabbin' Gary on the Spoon too (5).

Use the Spoon on Shay (1).

Shay Act 1
Click on the Creature to end the mission. Once back on the Bridge, choose "We need to help those avalanche victims!"


Avalanche Mission

Walk over to the left of the room. Use Grabbin' Gary on the room door (6) and the Banana Split (7). Walk back over to the Avalanche and use Grabbin' Gary on the Trapped Creatures (8).

Shay Act 1
Use the Spoon on the Avalanche to free the creatures and get another cutscene to witness the end of a tiring day. The next day, choose any of the cereals for breakfast. Once back on the bridge (for the final time), choose "Let's catch that runaway train!"


Runaway Train Mission
Use Grabbin' Gary on the Sleeping Bridge Man (9).

Use the Spoon on the Sleeping Bridge Man (2).
Click on the Sleeping Bridge Man to create a bridge across the canyon. Once the Knitted Creature has let go of the track and the train is rolling down the mountain, quickly click on the Sleeping Bridge Man again to withdraw the bridge and break the monotonous daily routine for Shay.

During the following cutscene, Shay will be returned to his room and he will receive the Screwdriver.


Shay's Room
Click on the blanket. Shay is now free from missions but is a prisoner in his own room. if he is to meet with Marek, he must escape his room.

Use Grabbin' Gary on Shay's Bed (10) and the Dad Orb (11) that is above the Bed.

Use the Spoon on Shay's Bed (3).
Walk to the right of the screen and pick up the Tank of Compressed Air that is to the right of the sign that says Until Further Notice.
Shay Act 1
Move further to the right to see the Vent that is near the ground to the right of the sign that says Missions Cancelled.
Use Grabbin' Gary on the closed Vent (12). You must do this before you follow the next instruction.
Use the Screwdriver on the Vent to open it and take out the Inflatable Doll that is inside.
Shay Act 1
Open your Inventory and use Grabbin' Gary on the Inflatable Doll while it is still deflated (13).
Open your Inventory and use the Tank of Compressed Air on the Inflatable Doll to create a doll that looks like Shay.
Open your Inventory and use Grabbin' Gary on the Inflatable Doll now that it has been inflated (14).
Walk back over to the Bed and put the Inflatable Doll on Shay's Bed. Cross the room again and exit through the Vent that you have just opened to trigger a cutscene.


Marek's Hub
During the cutscene you will talk with Marek, who will give you a Star Chart to take to the Space Weaver. Go through the Vent that is in between Shay and the door on the left to get to the next room.
Shay Act 1

Space Weaver's Room
Before doing anything else, climb down the ladder that is by Shay's feet. Use Grabbin' Gary on the Tapestry (15) that is directly underneath the Space Weaver. Climb back up the ladder.
Give the Star Chart to the Space Weaver. Once the ship has travelled to the Talon Nebula, make a MANUAL SAVE. You will need this in case you make a mistake with the mini-game that you're about to do in the next room. Go back through the Vent.


Marek's Hub
Talk to Marek, who will lead Shay over to a terminal that is used to save the helpless creatures. Press the green button to activate the Boom Arm. When the Arm is above the creature, press the flashing red button to lower it and save the creature. Once Shay has congratulated himself, use the yellow arrows to move the ship and locate another creature. Once again, lower the Boom Arm to save the creature. You must rescue both creatures without missing them once. If you miss and fail to grab a creature, reload your MANUAL SAVE. Take a look at the video below to see how it is done.


In the following cutscene, Marek will give Shay another Star Chart so that they can travel to another location and save more creatures. Go through the vent into the Space Weaver's Room.

Give the Star Chart to the Space Weaver. Once the ship has travelled to Danger System 5, make another MANUAL SAVE. Go back through the Vent to Marek's Hub.

In the following cutscene, Shay will automatically head over to the terminal. Using the same controls as before, Shay must now rescue five more creatures. Once again, you must rescue all of the creatures without missing them once. If you miss and fail to grab any of the creatures, reload your MANUAL SAVE. Take a look at the video below to see how it is done.


The ship has now been placed in lockdown and Shay runs back up to Shay's Room so that his parents don't panic about his safety. After the cutscene has ended, go back through the Vent to Marek's Hub. Talk to Marek again to receive instructions on how to continue the missions. Choose "How are we going to get control of the ship's cargo boom arms?" Then choose "How are we going to take down the shields?" to receive the Omicron Inhibitor. Next, choose "The distress call was from Prima Doom? How do we get there?" to receive another Star Chart. To end the conversation, choose "I'd better get back to the mission."
Before moving on, open your Inventory and use the Spoon on the Omicron Inhibitor (4).
To begin your mission, go through the Vent into the Space Weaver's Room. Exit through the door on the left into the Control Room where you'll watch another cutscene. Once the cutscene is over, go through the green door to the right of the control hub into the Teleporter Room. Go through the left Teleporter.


Trophy Room

Use Grabbin' Gary on any of the objects on the shelf (16) in the Trophy Room.
Pick up the Hazard Radiation Suit. When the Suit is added to your inventory, the Helmet will be added as a separate item. Go right through the Vent.
Shay Act 1

Marek's Hideout
Use Grabbin' Gary on the door to the Creature Containment (17).
Shay Act 1
Cross the room and exit through the right door into Marek's Hub. Cross this room and exit through the Vent into Shay's Room. Exit through the door on the right into the Left Corridor. Walk along the corridor to the right and enter through the door with a spoon on it.
Shay Act 1

Kitchen
Pick up the Knife that is to the bottom left of the screen as Shay walks in.
Shay Act 1
Open your inventory and use Grabbin' Gary on the Knife (18).

Use the Spoon on the Knife (5).
Go back through the door through which you came in. When back in the Left Corridor, exit through the door on the right into the Control Room. Cross the room and go through the blue door on the right to get to the Right Corridor. Go through the door with an icecream on it.
Shay Act 1

Avalanche Mission Room
Use the Spoon on the Whipped Cream Gun (6) that is spouting cream on the right side of the room. Do this before you pick it up.
Pick up the aforementioned Whipped Cream Gun.
Open your inventory and use Grabbin' Gary on the Whipped Cream Gun (19). Close the inventory and then use Grabbin' Gary on the Ice-cream Dump Truck (20) that is perched precariously at the top of the mountain.
Shay Act 1
At this point, you will have used Grabbin' Gary on enough objects to unlock:

Go back through the door into the Right Corridor. Walk to the right and go through the door with a smily face on it.

Shay Act 1

Friendship Circle Mission Room
Talk to the Knitted Creature. You need to stop his pain again, so choose "Hey, maybe I can fix your back" and pull the Crochet Hook out of the Creature's back. Then choose "Wellllllll... I gotta go." to end the conversation.
If you have missed any of the Grabbin' Gary opportunities, you can open your inventory and use Grabbin' Gary on the Crochet Hook (21).
Leave the room through the door through which you came in to get to the Right Corridor. Go through the door on the right to enter the Hallway.
If you have missed any of the Grabbin' Gary opportunities, you can use Grabbin' Gary on the Trash Chute (22) in between the door with a train on it and the blue teleporter.
Shay Act 1
Cross the room and exit through the door on the right with the Moon on it. Walk past the Warning sign in the Escape Corridor and exit through the Airlock to get a cutscene.
Shay Act 1

Space
Use the Tank of Compressed Air, Whipped Cream Gun and Knife on Shay. Move the cursor upwards into space until you see an Up Arrow and click to lift off from the ship. You'll get a very quick cutscene. Move the cursor towards the top of the needle-like antenna and left click on the mouse to jet over it.
Shay Act 1
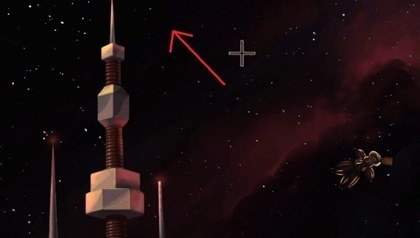
Fly over the antenna in the direction of the arrow
Then move the cursor to the left and keep clicking the left mouse button to jet towards the Control Hatch. While you can hold down the left mouse button to get the same result, tapping it allows for more control over where Shay is flying.
Shay Act 1
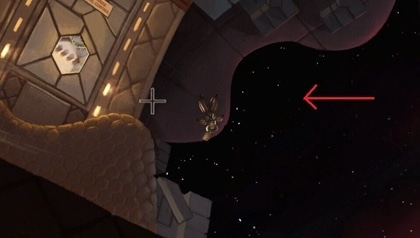
After flying over the antenna, fly left to the Control Hatch
Use the Spoon on the Control Hatch (7).

If you have missed any of the Grabbin' Gary opportunities, you can use Grabbin' Gary on the Control Hatch (23) too.
Use the Knife to open the Control Hatch. Then use Grabbin' Gary on the Control Hatch and his arms will latch onto the Boom Arm controls.

Once the cutscene has ended, jet back to the right to exit the close-up view of the Control Hatch. Jet back around the antenna to land on the ship. Exit through the Airlock Hatch. Walk back through the Escape Corridor and exit into the Hallway. Use the blue teleporter to get to the Teleporter Room. Take the middle teleporter.


Orb Room

Go through the doorway on the left to trigger a cutscene. Use the Helmet on Shay, then move the cursor down to the bottom of the screen until a down arrow appears. Click this to walk through the blue shield and towards the front of the room. As the camera view changes, you'll see the Fusion Orb. Place the Omicron Inhibitor on the Fusion Orb.

Return to the teleporter and take it to the Teleporter Room. Walk to the left of the room to exit into the Control Room. Cross the room and enter through the red door that is underneath the ship's controls.


Space Weaver's Room
Give the Star Chart to the Space Weaver. When he refuses to take the ship to Prima Doom, he will offer three alternative destinations. Choose "Fine. Cozy Cluster it is." As the Space Weaver initiates his protocols, climb down the ladder. Use the Crochet Hook on the Star Tapestry. As the camera zooms in to the Tapestry, it will unequip the item. Equip the Crochet Hook again and place crosses in the following places:

Shay Act 1
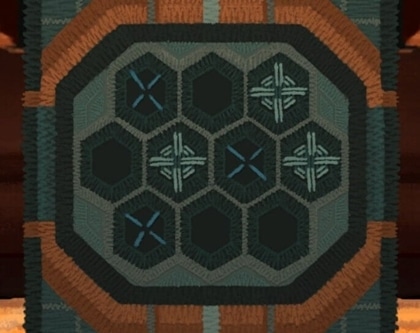
Click on Top Left, Bottom Left and the second from Right in the Middle row.
Once the ship has travelled to Prima Doom, you will unlock the following:

Make a MANUAL SAVE and then exit through the Vent.


Marek's Hub
Walk across the room and click on the Terminal. Using the same controls as before, Shay must now rescue the final three creatures. Once again, you must rescue all of the creatures without missing them once, but both the creatures and the Boom Arm are moving very quickly. If you miss and fail to grab any of the creatures, reload your MANUAL SAVE -- you'll likely need it here. Take a look at the video below to see how it is done.


If you have managed to rescue all ten creatures on your first attempt without missing any of them, you will unlock:

All that you have to do now is watch the cutscenes before you are automatically taken to the beginning of Vella's part of the story.

Click on Vella to wake her up and begin her half of Act 1. Click on the little girl, Rocky, Vella's younger sister, to get a cutscene. Once the cutscene is over, click on the nearest building, Vella's House, to continue.

Vella Act 1

Vella's House

Click anywhere in the darkness to move and trigger the next cutscene. We need to find that ceremonial knife. Pick up the Towel. Then pick up a Cupcake from the plate underneath the Towel. After this, talk to Levina. You need to pick these conversation options:

  • "Any idea where Mom's knife is?"
  • "Can I ask you about the Maiden's Feast?"
  • "How many of these feasts have you organized?"
  • "What IS Mog Chothra?"
  • "Where do creatures like Mog Chothra come from?"
  • "I want to go beyond the Plague Dam someday!"
  • "How much do we know about these Grand Mogs?"
  • "Why was I chosen?"
  • "Mog Chothra attacks other towns?"
  • "So, why don't we just FIGHT Mog Chothra?"
  • "My Grandpa doesn't look too happy about this feast."

Now talk to Grandpa Beastender.

Hide ads
  • "Do you know where Mom's knife is?"
  • "Yeah, I'm not sure how I feel about this Maidens Feast either."
  • "Why do you hate the Maidens Feast, Grandpa?"
  • "Why'd we stop being warriors?"
  • "Hey, Gramps. Want a cupcake?" / "I'd better go find that knife."

Vella Act 1
You will now have learned everything that there is to know about Sugar Bunting.

Give the Cupcake to Grandpa Beastender. He asks if you want to share the cake so ask "Split it with you?" Pick up the Knife that Grandpa Beastender has just thrown onto the counter. Give the Knife to Mom to trigger another cutscene.


Maidens Feast
Talk to the girl in the green Delish dress. After the cutscene, talk to the girl in the yellow Fun Size dress. Choose "Just wanted to say GOOD LUCK! Bye!". Talk to the girl in the purple Drink Me dress. Choose "Well, good luck!" Finally, talk to the girl in the red Hot Stuff dress. You'll then get another cutscene and Vella decides to escape from the Feast.

Talk to the girl in the purple Drink Me dress again. Choose "Hey, can I have a drink of that water?" During the cutscene, Vella will receive the Corset. Talk to her for a third time. Choose "Can I borrow that bottle one more time?" You'll receive the Water.

Give the Water to the girl in the yellow Fun Size dress. Then give her the Towel. When the bird re-appears, use the Corset on it. Then use the Knife on Vella's dress so that she can cut herself free.

During the cutscene, you'll fly to another town.


Meriloft
After Vella has fallen out of Jessie's nest, click the bottom of the screen to move forward. The camera will pan out and show the Central Area of Meriloft. Mog Chothra has already visited Meriloft, so Vella needs to find a way to leave this town. Climb down the ladder at the bottom of the screen.


Meriloft Maidens Feast Area
Talk to Twyla, the despondent girl swinging underneath a blue bird piñata. Choose "I really like your outfit". Although Twyla liked her outfit, her shoes were too tight, so Vella wants to say "Did you say something about shoes?" She will then give Vella a pair of Cloud Shoes. Pick "Well, I'll leave you alone." to end the conversation. Put the Cloud Shoes on Vella. Climb back up the ladder to the Central Area of Meriloft. Take the path that leads off to the right, but be careful to walk around the hole in the cloud.


Nesting Grounds
Talk to M'ggie, the girl on the right that is sweeping a bird's nest. Choose "What are you doing, exactly?". Then choose "How do you get to the eggs in the high nests?" Ask "Hey, can I borrow your ladder?" and M'ggie will give Vella her Ladder. Back out of the conversation.

Walk past M'ggie and use the Ladder on the high nest to the right. Grab the Knife that is sitting in the nest. Climb back down the ladder, walk all the way to the left of the screen to exit the area.

Vella Act 1

Central Area
Head over to the Cloud Shoes platform and talk to C'rol, who will drop her knife. Tell her "Well, I'll let you get back to your work..." Give the Knife to C'rol. She'll give Vella a pair of Large Cloud Shoes. Walk back down the steps and out along the path to the Nesting Grounds. Move the cursor near to the largest floating cloud and you should see an up arrow. Click it to move down the central path that leads into the Rear Nesting Grounds.
Vella Act 1

Rear Nesting Grounds
You should see a Gold Egg sitting in a nest in front of Vella. Open your inventory and use the Large Cloud Shoes on the Ladder. Then use the Ladder on that nest. Once Vella has scared away the bird, pick up the Gold Egg.
Vella Act 1
Climb back down the ladder and return to the Central Area. Walk over and use the Ladder on Jessie's Nest. Once Vella is standing next to Jessie, follow the path behind the nest that leads off the screen to the left.


Giant Fruit Tree
Walk across to the left, taking care not to fall through the holes in the cloud. Walk around the tree's trunk and grab hold of the leftmost branch. Vella will shake it until a Peach falls from the branch and through the cloud.
Vella Act 1
Click on the tree's trunk to fall through the gap there. Walk out along the left branch and pick up the Peach from the nest. Use the Peach on Vella as she is one of two people needed for the Produce Distributor achievement.

Walk out along the branch on the right to find Gus hanging from a tree branch by his underwear. Choose these conversation options:

  • "You're in big trouble, young man."
  • "Why don't you just let go?"
  • "What are you really doing down here?"
  • "Why would Jessie's egg need cleaning anyway?"
  • "Well, you hang in there, Kid."

Walk back to the tree's trunk and enter the hole to climb back up to the cloud. Once up on the path, walk back around to the leftmost branch and shake it again. Then walk to the right side of the screen and fall through the hole in the cloud that is at the top of the screen.

Vella Act 1
After the cutscene, click on the tree's trunk to fall through the cloud again. Walk along the left branch and pick up the second Peach. Then walk back out along the right branch and pick up Jessie's Egg. Enter the hole in the tree's trunk and climb back up to the cloud. Walk along the path to the right and leave the area.


Central Area
Give Jessie's Egg back to Jessie.

Pick up the Gold Egg that Jessie has now cast aside. Climb down the ladder and walk along the path on the left that leads away from the area.


Offering Area
Place a Gold Egg into one of the offering baskets before climbing up the ladder. Say "Hi!" to Brother Lightbeard. Exhaust all of the conversation options. Once the conversation has ended, Vella will climb back down the ladder.

Pick up the Gold Egg that Brother Lightbeard dropped. Place the two Gold Eggs into the remaining two offering baskets. Finally, climb up the ladder again to go crashing out of Meriloft.


Curtis' House
Inspect the stained glass window and catch the Stained Glass that falls out of it. Walk down the stairs. Take the Axe from the wall by the door. Inspect the Art above the fireplace and then talk to Curtis so that we can steal his art.
Vella Act 1
Ask "What's the matter with you?" Then ask "Hey, about this art." Pick any two conversation options before you will see "I like how it matches your decor." End the conversation with "Catch ya later, Curtis." Then take the Art off the wall. Finally, give a Peach to Curtis.

Climb back up the stairs and exit through the door on the left. Vella will climb the ladder back to Meriloft. Head out to the Giant Fruit Tree. Walk back around to the leftmost branch and shake it again. Fall back down the tree's trunk, grab the Peach from the nest on the left branch and then travel back through Meriloft to Curtis' House. Exit the house through the door on the right.

Woods
Follow the path. As the camera pans out, walk Vella towards you. When she's clear of the vegetation, walk to the left of the screen until you see a horn. Inspect the horn and a snake will jump on you. Let the snake squeeze Vella until she blacks out.

Vella will wake up back in Curtis' House. Return to the Woods and walk Vella back towards you again. This time, instead of heading left, head right to the next area of the woods. Walk right past the Talking Tree and exit the woods.


Shellmound
Cross the bridge and head to the right. Now that we're in Shellmound, the only way that Vella is going to encounter Mog Chothra is if she can enter their Maidens Feast, so we need to talk to the Mayor. He'll ask how Vella knew that he was a Mayor. "Because you look like a Mayor!". Then say "Hey, about your bucket hat..." and compliment him with "It looks great on you! Very fancy!". As the Mayor doesn't want to look fancy, he'll give Vella his Bucket. End the conversation by choosing "Better let you get back to the Feast!" We need to find something that will stop the sand castles being demolished by the waves. Pick up the Driftwood from the beach.

Vella Act 1
Leave Shellmound and return to Curtis' House.


Curtis' House
Give the Driftwood to Curtis. He'll be very impressed and will create a Stool out of the wood, which he will then gift to Vella. Exit his house and go back through the Woods. It is finally time to talk to the Talking Tree.


Talking Tree
Use the Axe on the Talking Tree. Back out of the conversation as we don't need to talk to the tree at this point. Hang the Bucket on the branch that is supposed to be his nose. Then show the Stool to the tree. Along with Vella's graphic description of tree mutilation, this causes the tree to barf into the bucket and gives Vella a Bucket of Sap. We're now done with the woods so we need to head back into Shellmound.


Shellmound
Give the Bucket of Sap to the Mayor. Now that there is going to be a Maidens Feast, Vella needs to look (and smell) the part. Walk to the right past the Maidens and try to ignore the absolutely shocking singing. Head up the steps and talk to the Dead Eye God's Bodyguards. Ask "Hey, can I get you guys something?", i.e. "Some more holy tear gas?" As the Bodyguards are fresh out of tear gas, they'll toss Vella the Tear Gas Gun so that she can refill it. Now ask "Can I go inside?". When they ask why, answer "Because you guys are guarding it. So it must be cool." After learning that you need to solve a riddle, back out of the conversation. Show the Peach to the Bodyguards to solve their riddle. They'll now let you go into the cave.


Dead Eye God's Cave
Use the Art on the art-shaped hole to the right of the cave.
Vella Act 1
It turns out that this isn't a cave; it's a ship that belongs to Alex. Back out of the conversation. Look at the multi-coloured amplifying quartz that is currently sitting in slot #2 in the screenshot below. It will fall out and smash on the floor, so Vella will need to replace it. Grab the Laser Coil from slot #1. Put the Laser Coil into slot #2. Then put the Stained Glass in slot #1. You've just created a Death Ray.
Vella Act 1

After the cutscene, Alex will give Vella the Detonator for the Death Ray and she'll walk back down the steps.


Shellmound
Fill the Tear Gas Gun using the foul-smelling Chum in the pan at the bottom of the screen.
Vella Act 1

Spray the Maidens with the Tear Gas Gun. During the birds' feeding frenzy, grab the Perfume bottle. Use the Perfume bottle on Vella so she'll have the correct scent to be able to enter the Maidens Feast. Talk to the Mayor again and tell him "I need to enter the Maidens Feast!"

It's show time. Watch as Mog Chothra claims both Maidens, leaving Vella to fight him alone. Use the Detonator on Mog Chothra. When the targeting reticule appears, aim it at three of Mog Chothra's four legs to burn them off. Then let Mog Chothra pick Vella up. Use the Ladder on his mouth to force it open. When he drops Vella, use the Detonator again and aim at his mouth.

You have just defeated Mog Chothra.

If you've been following the guide and completed both Vella and Shay's parts of Act 1, you'll also get the following achievement after the cutscene.

It's time to move on to Act 2.

Click on Shay to begin his half of Act 2. Pick any of the conversation options and then watch as Shay's Dad free's himself from the sand. Then pick any of the conversation options again to see a cutscene where Shay is told that they must rescue his Mom from inside the ship.

Use the Spoon on Shay's Dad (8) and the destroyed spaceship (9).

Hide ads

Shay Act 2

Head left to leave the crash site.

Shellmound

Pick up the Broken Hexipal.

Use the Spoon on the Mayor (10), C'rol (11) and the bowl of Chum (12) that is still sitting on the beach. Then open your inventory and use the Spoon on the Broken Hexipal (13).

Shay Act 2

Head to the right and up the steps -- we need to visit Alex.

Alex's Ship

After the cutscene, exhaust all of the conversation options. During the conversation, Alex will give you the Hypercam Schematic.

Use the Spoon on Alex (14) and the Charging Station (15). Open your inventory and use the Spoon on the Schematic (16).

Shay Act 2

Head back out of Alex's Ship and down the steps. Walk through Shellmound and across the bridge. Walk past the Talking Tree to reach the Woods outside Curtis' House.

Woods

Go all the way to the left of the screen to be attacked by the snake. Let the cutscene play out -- do not blow the horn. Once the Snake has exhausted itself, pick it up. Then click on the mailbox that is outside Curtis' House. You'll take a Flyer out of the mailbox.

Open your inventory and use the Spoon on the Snake (17)

Head into Curtis' House. As this is the first time that you've met Curtis, you'll start a conversation with him. Choose these options:

  • "Space"
  • "What are you making?"
  • "What are you forging?"
  • "What is it?"

Back out of the conversation.

Use the Spoon on Curtis (18)

Climb up the stairs and exit the house by climbing the ladder to Meriloft.

Offering Area

Walk past F'ther to get a cutscene.

Use the Spoon on F'ther (19)

Make a MANUAL SAVE at this point. The following puzzle must be completed correctly on your first attempt. If you get it wrong, you can always reload the save and reattempt the puzzle. Get on the ladder that leads up to Brother Lightbeard's cloud. While standing on the ladder, talk to F'ther. Choose these options:

  • "Can you untie that bow on Harm'ny's cloud?"
  • "Because it's in the way of us saving him!" During this conversation option, you will see a picture of the knot. Your knot will look like one of the following eight options. Underneath is the description that you will need to give to C'rol when we get back to Shellmound.

Shay Act 2Like an alligator wrestling a pretzel.

Shay Act 2Like a lazy pole vaulter.

Shay Act 2A little bit like you, strangely enough.

Shay Act 2Like a mathematical formula.

Shay Act 2Like an elephant eating its trunk.

Shay Act 2Like a face that's really a cow's udder.

Shay Act 2Like a bucket of fingers.

Shay Act 2Like a headache wearing a belt.

  • "Hm, sounds bad. I'd better go find a knot expert for advice."

Get off the ladder and return to Shellmound.

Shellmound

Talk to C'rol. Choose "You seem good with your hands. Know anything about KNOTS?" You now need to choose which of the four replies looks most like your knot. The problem is that C'rol can't draw a diagram without a writing utensil, so we'll need to find one.

Use the Snake on the Mayor. He'll cough up a Flute. Talk to the Mayor:

  • "Who are you?"
  • "Do you know anything about electronics?"
  • "Do you know how to build a Superconductive Gyroscopic Hypercam?"
  • "I think sand is the perfect material for making spaceship parts!"

You will give the Schematic to the Mayor, who will build you a Hypercam Sand Model.

Use the Spoon on Shay's Dad (20) and the bowl of Chum (21). Open your inventory and use the Spoon on the Flute (22).

We need to talk to Alex again.

Alex's Ship

Talk to Alex. Ask "Can I borrow your space pencil?" and Alex will give you his Pencil. Choose "Okay, see you later!" to end the conversation.

Return to Shellmound. Give the Pencil to Carol. She will draw a Knot Diagram that will help to untie the knot.

Leave the area by crossing the bridge into the woods again.

Talking Tree

Place the Hypercam Sand Model on the resin patch that is on the floor in front of the tree. Then show the Flyer to the tree. He will barf over the model to create a Hypercam Mold.

Use the Spoon on the Talking Tree (23).

Shay Act 2

We need to see Curtis again so head towards his house.

Curtis' House

Give the Hypercam Mold to Curtis. He will create a Superconductive Gyroscopic Hypercam.

Pass through Curtis' House and climb the ladder back to Meriloft.

Offering Area

Climb back onto the ladder leading to Brother Lightbeard's cloud. While standing on the ladder, talk to F'ther again. Choose "Let's give that knot another try, okay?" You will then see your Knot Diagram with three pictures. You need to describe these pictures in order to untie the knot. These are the 12 possible pictures that you could have:

Shay Act 21. She loves me, she loves me not...
2. Pull off the fly's wings.
3. Tug on the piggy's tail.

Shay Act 21. Make the baby play patty-cake.
2. Unravel the sweater.
3. Tickle the foot.

Shay Act 21. Pull apart the fighting snakes.
2. Pull the finger.
3. Poke the clown in the eye.

Shay Act 21. Make the water come out of the cup.
2. Make the boat go under the bridge.
3. Steal the banana.

If you have identified the knot correctly and given F'ther the correct instructions, he will finish untying the knot and the cloud will unravel:

If you don't get the achievement, reload your manual save. The game will generate another knot for you but the good news is that the game won't recognise that you got the puzzle wrong already.

During the following cutscene, the unravelled cloud reveals that a Hypergravity Thruster has been holding Brother Lightbeard up in the sky. F'ther helps you to deliver the Thruster back to Alex in his ship:

Once the cutscene is over, give the Superconductive Gyroscopic Hypercam to Alex:

Now we need to sort out the electronic genius, the radiation suit and fix the ship's undercarriage. Leave the ship and cross the bridge into the woods.

Talking Tree

Make another MANUAL SAVE. You need to tell the tree a joke, but you need to get the joke right on your first attempt. If you mess the joke up, just reload your save again. Choose these options:

  • "Don't worry. I've seen much weirder stuff than talking trees where I'm from."
  • "I understand why you're so mad."
  • "That fish up there in your branches... can I have it?"
  • "Oh come on. You don't need that fish."
  • "Hey, want to hear a joke?"

The perfect joke has three parts. The four conversation options that the game presents to players are randomly generated, but you will always be able to tell one of the following three great jokes:

Joke 1
• "What's the smallest full-grown tree you ever heard of?"
• "I've seen one no bigger than my hand."
• "A Palm Tree."

Joke 2
• "Did you hear about the First National Tree Bank?"
• "It closed down!"
• "Don't worry. It just started a new branch."

Joke 3
• "Say, do you know Ol' Pete the Pine Tree?"
• "Well, I hear he got in some really big trouble."
• "It seems he was being... really knotty."

Once you have finished telling the joke correctly, you will get:

Talk to the tree again. Choose the conversation option that is relevant to your joke and the tree will tell you how you did:

End the conversation. Pick up the Talking Fish. We need to return to Meriloft. Once at the Offering Area, walk along the path to the centre of Meriloft and then head out along the path to the right.

Nesting Grounds

Talk to Rocky and M'ggie.

  • "I want a cupcake!"
  • "How about a trade? I could give you something."
  • "Well, bye! Good luck with the bake sale!"

Go down the path leading to the Rear Nesting Grounds. Talk to Grandpa Beastender and Ch't. Choose "Do you guys know any place here to get some money?" Ch't will give Shay a Coin. Back out of the conversation. Return to the Nesting Grounds. Give the Coin to Rocky and M'ggie and they'll give you a Cupcake.

Use the Spoon on Rocky and M'ggie (24). Open your inventory and use the Spoon on the Cupcake (25).

Head left out of the Nesting Grounds.

Meriloft Central Area

Give the Cupcake to Vella's Dad and Walt'r. Walt'r will then lick the frosting off the cupcake before giving it back to you.

Use the Spoon on Vella's Dad (26).

Return to the Nesting Grounds and head back towards Grandpa Beastender and Ch't.

Rear Nesting Grounds

Give the Cupcake to Grandpa Beastender. He will refrost the cake but this means that he has no more frosting in his cane. He will give the Cane to Shay to get it refilled.

Use the Spoon on Grandpa Beastender (27). Open your inventory and use the Spoon on the Cane (28).

Head back to the Central Area. Climb the ladder to Jessie's nest.

Use the Spoon on Jessie (29).

Follow the path that leads away from there.

Giant Fruit Tree

Head towards the tree. Fall down the centre of the tree trunk. Walk along the left branch and pick up a Peach.

Open your inventory and use the Spoon on the Peach (30).

At this point, you should have used the spoon on enough objects and people to get:

Talk to Gus:

  • "What's that thing you're sticking in the fruit?"
  • "Hey, can I borrow that little fruit tapper?"
  • "I'll let you get back to your juice."

After Gus has given you the Fruit Tapper, climb back up the tree trunk. Talk to the Dead Eye God's Bodyguards. Choose these options:

  • "If you give me back those robes, I promise Alex won't press charges."
  • "I'll fight you for those robes, no problem. I need them to help my mom."
  • "I'll be back."

If you have missed any of the Spoon opportunities, use the Spoon on the Dead Eye God's Bodyguards (31).

Use the Cane on the Dead Eye God's Bodyguards. Pick up the Robes that they have dropped and leave this area.

Meriloft Central Area

Stand in Jessie's Nest and use the Fruit Tapper on Jessie's egg. Pick up the Eggshells that drop below the nest.

If you have missed any of the Spoon opportunities, use the Spoon on the Eggshells (32).

Climb down the ladder to Meriloft's Maiden's Feast Area.

Meriloft Maidens Feast Area

Talk to Brother Lightbeard, who is sitting in a cage underneath the body of a green bird. You'll need to click on him three times before he tells you that he is sick of fish:

Talk to Twyla and Vella's Mom:

  • "What were you guys talking about when I walked up?"
  • "Maybe he tried to get you, but something came up."
  • "Swinging!"
  • "Well, at least your costume is cool."
  • "Do you think you could make me a costume?"

If you have missed any of the Spoon opportunities, use the Spoon on Vella's Mom (33).

Give the baby sized Hazard Radiation Suit and the Robes to Twyla. She will create an adult sized Hazard Radiation Suit for you. Now we need to tie up some loose ends in Shellmound.

Shellmound

Show the Talking Fish to C'rol. Then show the Crochet Hook to C'rol. Choose "But please promise to leave SOME fish in the ocean for future generations." C'rol will throw away the Wire that she was using.

If you have missed any of the Spoon opportunities, use the Spoon on the Wire (34).

Talk to Shay's Dad. Choose "What's cookin'?" before backing out of the conversation. Use the Spoon on the bowl of Chum to get a pH reading. We need to get the Chum to give a pH reading of 7. If you use the Peach on the mixture, it will decrease the pH level by two. If you add the Eggshells to the mixture, it will increase the pH level by three. Use as many of each as necessary to reach the correct pH level. Once the pH has reached 7, you'll get a cutscene where Shay's Dad takes the mixture to Alex:

Alex's Ship

Give the Hazard Radiation Suit to Alex. This will give you the penultimate achievement for Shay's part of Act 2.


If you weren't following this guide, the final achievement in Shay's part of Act 2 would require you to play part of Vella's side of Act 2 to know the answer to the puzzle. Once Vella has reached the control room with Shay's Mom, she will be able to examine a family photo. That photo has six symbols behind the head of Shay's Mom. These symbols are the same in every playthrough and are below so that you can finish Shay's side of the story before we move on.

Shay Act 2


Open your inventory and use the Wire on the Hexipal. You will be able to create links between the terminals using three bits of wire. For now, link them together like the diagram below:

Shay Act 2


Put the Hexipal in the Charging Station. You will then see what symbol is represented by each terminal. This layout varies in every playthrough, so the symbols represented by each terminal are likely to be different for you. This was the image from my playthrough.

Shay Act 2


Take the Hexipal out of the Charging Station and change the wiring so that it matches the layout in the family photograph. Place the Hexipal back into the Charging Station. If your wiring is correct, you will get a cutscene where the Hexipal comes back to life. Give the Hexipal to Alex:


Back out of the conversation. Give the Flute to Alex. He will play you the navigation tune. Make a note of the tune because you will need it for Vella's part of Act 2. Now, we don't need to wait for Shay's Dad to finish fixing the hull. What we actually need to do is to complete Vella's part of Act 2. Press I to open the inventory and click on Vella's icon to start her story.

Click anywhere around Vella to wake her up and watch as the Knife narrowly misses her. Talk to the Knife again and exhaust all conversation options. After this, the Knife will be added to Vella's inventory. Move over to the right.

Grab the Helmet from the fissure in the wall. Use the Knife on the pipe that is dangling from the top doorway to get a short piece of Hose.

Hide ads

Vella Act 2

Use the Hose to connect two of the steaming pipes so that the middle hexagonal section of the wall is extended (see screenshot below). The two pipes that need to be connected are always randomised, so you'll need to use trial and error until you get the correct solution.

Vella Act 2

Climb up the dangling pipe. Use the Knife at the top of the pipe. Vella will fall but the extended section of wall will break her fall and she will now be left with a longer section of Hose. Use this new section of Hose to connect one of the pipes on the left to one of the pipes on the right. Again, the two pipes that need to be connected are always randomised, so you'll need to use trial and error until you get the correct solution. You will know that you have the correct solution when you get cutscene that results in Vella floating away from the area.

Use the Helmet to lure the Grabbing Hand towards Vella. The timing must be exact so that Vella holds out the Helmet when she is facing the Hand and the Hand is pointing towards Vella. Use the Grabbing Hand to grab the Boot that is floating to Vella's right. Use the Hand + Boot to attract Vella towards the robotic hand. Once she is attached to the hand, push off towards the open airlock.

Escape Corridor

Once Vella has landed inside the ship, walk left through the Escape Corridor, through the Hallway and through the Right Corridor until you reach an obstacle. Move the obstacle out of the way. Continue along the corridor into the Fake Control Room. Walk around the fake controls and into the Left Corridor.

Left Corridor

Walk past the Kitchen and you will see a door with a flashing window. Click on the door to talk to Shay's Mom.

Vella Act 2

Follow the conversation options in the exact order below or you will skip some options that are needed for an achievement.

  • "My name is Vella Tartine, and I'm here to take you down."
  • "Engineering department. Just a routine maintenance visit."
  • "The ship's on fire! You have to get out of there!"
  • "All clear. It's safe to come out now."
  • "Is this Mog Chothra's brain?"
  • "Can you open this door?"
  • "It's me. Shay."
  • "I was... injured. It's affecting my voice."
  • "It's me! Don't you recognize me?"
  • "Okay, I'm not really Shay."

You need to convince Shay's Mom to open the door. We need to make Vella look like Shay. Enter Shay's Room and go through the Vent.

Marek's Hub

Choose these options during the conversation with Marek:

  • "Can we stop this ship?"
  • "Can you open any of the locked doors on the ship?"

Back out of the conversation. Head left through the door that Marek has just unlocked. Walk through Marek's Hideout and through the vent into the Trophy Room. Enter the Teleporter on the left and travel to the Teleporter Room. This makes Vella's head bigger, but it isn't quite big enough to pass for Shay yet.

Head left out of the Teleporter Room into the Fake Control Room. Return to the Hallway and take the blue teleporter back to the Teleporter Room. Now that Vella's head is large enough, we need to head back to Shay's Mom but you can't go back through any of the teleporters. Instead, head left to enter the Fake Control Room and make your way back to the Left Corridor.

Left Corridor

Talk to Shay's Mom again. Choose "It's me. Shay." Now you need to answer a few easy questions. The answer to the first question is the name that Shay gives to the snake when it is squeezing him in Act 1. The second is the response that Shay gives to his Mom every time that she gives him a cutesy nickname. The third answer can be deduced from clues in the Trophy Room. However, you need to get this right on your first attempt, so the answers are:

  1. Mister Huggy.
  2. Please, can we not do this?
  3. Purple. Size 4... Polka-dot.

Giving the correct answers on your first attempt will give you this:

During the following cutscene, Vella will gain access to the Real Control Room:

Real Control Room

You will now have another conversation with Shay's Mom, only this time you will be face to face.

  • "Who are YOU and why have you been kidnapping girls with this ship?"
  • "Where is the big "Mom" computer that controls this ship?"
  • "My name is Vella Tartine. I shot down your ship."
  • "The wolf told me about you!"
  • "I want some answers!"
  • "You are NOT in space. Look at that window!"

After another cutscene, you will be left to your own devices in the room. Select the video screen to have a conversation with Marek. Exhaust all of the conversation options:

We have one more thing to do before we try to escape from the room. Talk to Shay's Mom again. Exhaust all of the new conversation options. Now we need to escape from the room. Pick up the Fork from the salad. Now make a MANUAL SAVE and then use the Central Control Sphere.

Vella Act 2

This is another puzzle that you need to complete without error on your first attempt. First, we'll make sure that everything is in the right place. As soon as Vella's face appears in the door to the Real Control Room, press the left arrow to be taken into Shay's Room. Here, click on the arm to remove the debris from the bed and move inflatable Shay into the Kitchen. Then click on the sad face as you need to remove all 8 sad faces from the Bassinostra. Once this is done, click the right arrow to be taken back into the Left Corridor.

Vella Act 2

Unlock the Kitchen door. Press the arrow to be taken into the Kitchen.

Vella Act 2

Click on the sad face to turn it into a happy face. Exit the Kitchen back into the Left Corridor. Click the right arrow to head into the fake Control Room.

Vella Act 2

Unlock the door to the Space Weaver's Room, then click the right arrow to head into the Right Corridor.

Vella Act 2

Click on the five sad faces to turn them into happy faces. Unlock the two doors into the Avalanche Mission Room and the Friendship Circle Mission Room. Click on the right arrow to be taken into the Hallway.

Vella Act 2

Click on the final sad face:

Unlock the door to the Runaway Train Mission Room.

Vella Act 2

On the right side of the room is a Hexigal. This Hexigal can fix the controls on the outside of the Real Control Room, but you need to lure her there first. You do this by overloading the circuits, but you also need to turn off the lights because the Hexigal will only fix circuits that are in darkness. If there is too much light, she assumes that there isn't a problem. Follow the video below to see how it is done.

If you got this far but the Hexigal turned back on itself at least once, reload your save and try again. If you got the Hexigal to the Left Corridor in one smooth transition, head into the Kitchen. Here we'll see the unfortunate Hexigal clinging on to the edge of the hole in the Kitchen. Click on the happy face until the display reads Taco Pill Tuesday. Click on the arm icon to pluck the Hexigal back into the Kitchen. Then, click on the lightning symbol by Vella's face to lure the Hexigal back into the Left Corridor.

Once you have done this, we'll save a bit of time for later and click on the display until it reads Good Morning! Use the arm icon to lower the arm. You'll see a scene play out with the ship's trash collector. Click on the arm to lower it again. When it reaches its lowest point, pause it.

Vella Act 2

Select the lightning icon in the Left Corridor and the Hexigal will eventually make its way over to the door:

Before we go anywhere, talk to Shay's Mom again. Choose all of the conversation options. You will finally have talked to Shay's Mom enough to get to know her:

Leave the control room and enter the door to the Kitchen.

Kitchen

Pick up Inflatable Shay. Leave the Kitchen and make your way to the Right Corridor. Enter the first double door.

Avalanche Mission Room

Use the whipped cream gun on the right to inflate the Inflatable Shay. Put the Cloud Shoes on Vella. Climb up the mountain to the pickup truck and use the Helmet on the pickup truck to get a Bowl of Icecream. Leave the room.

Vella Act 2

Right Corridor

Head further along the right corridor. As you pass the obstacle, move it back across the floor so that it is causing an obstruction again. Then exit the corridor into the Hallway. Enter the mission room here.

Runaway Train Mission Room

Give Inflatable Shay to the conductor. Vella will then take the Runaway Train mission. When asked about the Wave, reply with "Yeah, let's do the WAVE!" Vella will be left with a pile of Yarn. Once she has been kicked out of the room, take the Teleporter to the Teleporter Hub. Wake up the central Teleporter -- we need to use that one now.

Orb Room

Go through the door to the left and watch as Vella is nearly killed by falling debris. Walk towards the front of the room to find the Fusion Orb. Use the Bowl of Icecream on the Fusion Orb to create your Bomb. Leave the Orb Room and return to the Kitchen.

Kitchen

Click on the Cereal Box. Some cereal will fall onto the floor and the Trash Collector will come rushing through the room to tidy up the mess. You need to follow it. Leave the room and follow it as far as the Fake Control Room. Instead of following the trash collector into the Right Corridor, enter the Teleporter Hub. Take the right Teleporter.

Hallway

As soon as you enter the room, quickly click on the trash chute. You will stop the trash collector from closing the trash chute, but she will also throw some Cereal at you. Place the Bomb into the trash chute:

Vella Act 2

Take the Teleporter back to the Teleporter Hub and take the left Teleporter to the Trophy Room. Crawl through the vent on the other side of the room.

Marek's Hideout

Click on the panel to the right of the flashing door.

Vella Act 2

The panel will clear and you will be able to chat with the maidens that were captured by Mog Chothra.

  • "Mog Chothra, the Maidens Feast--it was all a big scam!"
  • "Hey, I've got some cereal here. Do you want some?"

Give some of the Cereal to the maidens. As they are trying to hook the cereal under the door, grab the Hook from them. Click on the panel at the side of the door again to set off an alarm. Marek will come to investigate the disturbance as Vella makes a quick exit back to the Trophy Room. Take the Teleporter back to the Teleporter Hub and make your way to Shay's Room. Climb through the vent.

Marek's Hub

Make your way across the room and use the Computer. This will lock the door so that Marek can't leave his Hideout. Pick up the Star Chart from the side of the computer.

Vella Act 2

Marek will manage to force his way through the door so Vella needs to make another quick exit. Take the vent back to Shay's Room and make your way to the Fake Control Room. Go through the red door.

Star Weaver's Room

Open your inventory and combine the Fork with the Yarn. Stick the Fork in the Star Weaver to wake it back up. Finally, we need to plot a course away from Loruna. The problem is that the destination on the Star Chart is the same as the current location, so we need to alter it. For this, we need a pattern that is gained during Shay's part of Act 2 when Alex plays the Flute. The tune that he plays is "middle note, middle note, high note, low note, middle note". If you were to plot that on a Star Chart, it would look like this:

Vella Act 2


This is the pattern that we need to create. Give the Star Chart to the Star Weaver. As the Star Weaver prepares to transport the Ship, climb down the ladder so that you can see the tapestry. Use the Hook to alter the tapestry so that it shows the pattern in the above screenshot.


Unfortunately, Shay's Mom has prevented the ship from transporting anywhere, so we need to talk to her back in the Real Control Room. As soon as you enter this room, you'll set off a cutscene that signals the end of Act 2:

  • Dammed

    Complete Act 2 of Broken Age

    Dammed
    Offline Mode - These achievements require play in game modes that do not necessitate a connection to any online services.Single Player - These achievements can be obtained by a single player.Main Storyline - These achievements are gained automatically by progressing through the main game mode.


It's time to begin the final part of the game...

Unlike the last two acts where we you did each character's part of the game separately, this section requires players to switch between the two characters on multiple occasions.

After the cutscene has ended, you'll see the two ships stuck together as they each block the other's programmed path. Click on the ship on the right as we need to take control of Vella first. Leave the Real Control Room and head along the Left Corridor. Underneath the debris that was blocking the hole in between the Real Control Room and the Kitchen is Vella's Hexipal friend, now broken. Pick up the Hexipal.

Hide ads

Finale

Enter the Fake Control Room. Use the Detonator on the other ship that we can see through the window. You'll see a cutscene where Alex panics about the ship overheating and turns off the power to the Death Ray. Leave this room and walk back into the Real Control Room. Open your inventory and switch to Shay.

Shay

You will get a cutscene where Alex is trying to calm down Vella's panicked family. Once that is finished, talk to Alex. Shay will try to insist that Vella is using the Death Ray for a reason and it will unlock the following achievement:

Now it is Shay's turn. Open your inventory and use Grabbin' Gary's Remote. This time you will see a cutscene where Shay's Mom switches the Boom Arms from manual to automatic so that the ship lets go of the other one. Open your inventory and switch back to Vella.

Vella

Talk to Shay's Mom:

  • "My friend, Alex, is flying that other ship. It came from Shellmound!"
  • "Why don't you want our ship grabbing the other ship?"
  • "SHAY was in Shellmound when I saw him!"
  • "But what if it's Shay who's controlling the arms?" **
  • "Can't you go around them?"
  • "Do you think the other ship has the same navigation problem?"
  • "Can't we just push them out of the way?"
  • "Maybe you should get off the ship. It's me they want."

That dialogue will unlock the following achievement:

Leave the Real Control Room, enter Shay's Room and go down the Vent into Marek's Hub. Pick up the piece of Wire that is sitting on Marek's computer. This will trigger a conversation with the Boss. Exhaust all of the conversation options to receive the following achievement:

Open your inventory and combine the Wire and the Hexipal. Pay special attention to the burn pattern when you look at its back, because this pattern shows you how to rewire the Hexipal. This layout varies in every playthrough, so the pattern is likely to be different for you. This was the image from my playthrough.

Finale

You'll notice that three of the terminals have large burn patterns. These are the starting terminals for each of the three wires. The burn patterns also indicate in which direction the wire travels from that terminal. Finally, the burns have a slight colour to them, indicating which was the blue terminal, which was the yellow and which was the red. Starting with the blue and finishing with the red, wire up the Hexipal. This is how mine looked once I had finished.

Finale

If you have the correct pattern, the Hexipal will start waving its flashlight again. Make a note of this pattern as you will need it for Shay in a little while. Meanwhile, go back the way that you came and make your way into the fake Control Room. Go through the red door into the Star Weaver's Room. There is nothing more that we can do for now, so we'll switch back to Shay.

Shay

Go through the door behind Alex and have a quick chat with Shay's Dad. In this room, you will see an open book in the bottom left corner of the screen that you need to read. It will show you the coding pattern to enable a Hexipal to play the harp. Make a note of this as you will need it for later.

Finale

Click on the door on the left and you will see four mysterious shadows come out of the wall and run away. Ignore them for now; go through the door on the right into the Music Room. Pick up the Broken Radio that is sitting near the bottom of the screen.

Finale

Leave the Music Room and climb back up the ladder to the Control Room. Show the Broken Radio to the Hexipal that is dancing with Rocky. The Hexipal will fix the radio and accompany Shay. Give the Radio to Alex. Go back through the door behind Alex and climb down the ladder. This time, head through the door on the left and your path will be blocked by a group of four rogue Hexipals. Show the Hexipal to the group, who will now follow you.

Head back into the Music Room and walk up to the harp so that all of the rogue Hexipals can fit in the room too. Use the Hexipal with the harp. While this isn't the correct solution for the puzzle, it will cause the rogue Hexipals to start dancing and unlock this achievement:

Shay will automatically pick the Hexipal up again. Inspect the back of the Hexipal and rewire it so that the wires match the following combination:

Finale

If you get the pattern right, the Hexipal will perform Raz's victory dance from Psychonauts and will unlock the following achievement:

Now, let's solve the puzzle. Rewire the Hexipal again so that its wires match the pattern that makes it play the harp:

Finale

Use the Hexipal with the harp. This will distract the rogue Hexipals so that Shay can get past them. Leave the Music Room and go through the left door again. Inspect the switch on the wall. Instead of a switch, Shay will find an old Mallet. Follow the path past the switch and around to the other side where Shay will find the proper power switch. Click on it to turn it back on. However, if we don't find a way to distract Alex, as soon as Vella uses the Death Ray again, Alex will shut down the power once more.

Finale

Go back to the Music Room. Retrieve the Hexipal from the harp. We need to rewire him once more. Do you remember the pattern that was needed to repair Vella's Hexipal? That is the pattern that you now need to use for Shay's Hexipal. Once you have finished rewiring it, use the Hexipal with the large drum and it will start tapping the drum. We need to make a louder noise. In your inventory, combine the Hexipal with the Mallet. Then use the Hexipal with the drum again. Cue a Hexipal percussion party and a cutscene as Alex wrestles the Hexipal for possession of the mallet.

Now is time to make your exit. Leave the room and climb back up to the Control Room. There is little more that we can do with Shay right now, so switch back to Vella.

Vella

Just as Shay has distracted Alex, Vella needs to distract Shay's Mom too. Climb down the ladder that is next to the Star Weaver. Rewire the Hexipal so that it is playing the harp and then use the Hexipal on the Star Weaver's tapestry. This makes the Star Weaver laugh uncontrollably. Leave the room through the door. As you do so, you nearly collide with Shay's Mom, who has come to investigate the Star Weaver's strange behaviour.

Quickly hurry to the Real Control Room. Use the Ship's Controls to set the Boom Arms back to manual control.

Finale

Walk back out to the Fake Control Room so that you can see the other ship again. Use the Detonator and watch the following cutscene. Switch back to Shay.

Shay

Use the Grabbin' Gary Remote. This will trigger the end cutscene. I won't spoil the ending of the game, but I will tell you that you'll get the achievement for completing the game:

All that is left now is to complete the game with a save file that totals less than one hour. If you want to get the achievement for the speedrun, and the achievement for unlocking all of the others, head over to the next page.

At this point, the only achievement that you should need is the one for completing the game in under an hour (and the one for unlocking all of the others, of course). For this one, you will need to start a brand new save and complete Act 1, Act 2 and the Finale in less than 60 minutes. Here are a few tips to bear in mind before you start your run.

1) The 60 minutes only includes the time while you are playing the game. Loading times and paused gameplay don't count. If you're stuck on a puzzle or can't remember where you need to go next, pause the game to read the walkthrough because you won't be penalised for this.

Hide ads

2) Make frequent manual saves, particularly before puzzles that require skill and timing to get them right. If you make a mistake and take too much time on a puzzle, such as the crane game, reload the save file and try again. You can reload saves and replay sections as many times as you like to get a good run before you move on.

3) Don't click on any items that are not mentioned in the steps below. These just add unnecessary time and interactions to your playthrough. Similarly, don't select any unnecessary conversation options for the same reason. While the 60-minute run is definitely possible, the time limit isn't generous enough to allow for a lot of extra steps.

4) Skip dialogue and cutscenes. If you listen and watch everything that goes on, there's no way that your save will clock in at under 60 minutes. There are some cutscenes and conversations that can't be skipped -- I'll mention these as we go on.

5) When travelling from location to location, be sure to double click on the transition arrows. This means that you don't have to watch the characters walking/running across the screen and it saves a lot of time.

As a guideline, these are the ideal times for getting through each section. Create a manual save at the start of each section and turn off autosaves so that if you ever exceed the time limits for any of these sections, this will allow you to replay them without losing any of your progress in earlier sections.

Act 1 Shay: 8-12 minutes

Act 1 Vella: 9-13 minutes

Act 2 Shay: 9-13 minutes

Act 2 Vella: 12-15 minutes

Finale: 4-5 minutes

TOTAL: 42-58 minutes

The guide below is a simple itemised list of the actions that you need to complete to get through the game. I won't be using too much detail as this should be your second playthrough. If this is your first playthrough, I really recommend that you first use the walkthrough that starts on page three.

ACT 1: SHAY

  • Click on the orb with Shay's Dad in it. When Shay's Mom has appeared, click on Shay's blanket to trigger a cutscene.
  • Accept the Choco Rockets (bottom conversation option).
  • Pick up the Spoon and use it on the cereal bowl to see another cutscene.
  • Choose the "Better suit up and investigate that foreign body" conversation option.
  • Walk over to the right side of the screen to see the foreign object. Click on the Plant to receive a Parcel.
  • Shay will return to the Bridge where he must pick another mission. Choose "We have to defend the Friendship Circle!"
  • Click on the Creature to see another cutscene.
  • Once back on the Bridge, choose "Let's catch that runaway train!"
  • Click on the Sleeping Bridge Man to create a bridge across the canyon. Once the Knitted Creature has let go of the track and the train is rolling down the mountain, quickly click on the Sleeping Bridge Man again to withdraw the bridge. During the following cutscene, Shay will receive the Screwdriver.
  • Click on the blanket. While in Shay's Room, pick up the Tank of Compressed Air and unwrap the Parcel to receive Grabbin' Gary. Unscrew the Vent and take out the Inflatable Doll that is inside.
  • Combine the Compressed Air and Inflatable Doll. Place the Inflated Doll on Shay's Bed and then exit through the Vent. In the following cutscene, you'll receive a Star Chart.
  • Go through the Vent into the Space Weaver's Room. Give the Star Chart to the Space Weaver. As soon as you regain control of Shay, whilst the Space Weaver is preparing to transport the ship, return through the vent into Marek's Hub. You don't need to watch the Space Weaver transport the ship and this saves valuable seconds.
  • Talk to Marek and carry out the first rescue mission. In the following cutscene, Shay will receive a second Star Chart.
  • Go through the vent into the Space Weaver's Room and give the new Star Chart to the Space Weaver. Again, as soon as you regain control of Shay whilst the Space Weaver is preparing to transport the ship, return through the vent into Marek's Hub.
  • Complete the second rescue mission.
  • Leave Shay's Room through the Vent and talk to Marek. Choose the following conversation options:
    • "How are we going to get control of the ship's cargo boom arms?"
    • "How are we going to take down the shields?" (you'll receive the Omicron Inhibitor).
    • "The distress call was from Prima Doom? How do we get there?" (you'll receive another Star Chart).
    • End the conversation by choosing "I'd better get back to the mission."
  • Go through Marek's Hideout into the Trophy Room. Grab the Hazard Suit Helmet.
  • Take the Red Teleporter up to the Teleporter Hub. Go through the Fake Control Room and take the door into the Left Corridor.
  • Enter the Kitchen. Grab the Knife in the bottom left corner of the screen.
  • Return to the Fake Control Room and pass through the right door into the Right Corridor.
  • Go through the door with the Icecream Mountain on it. Grab the Whipped Cream Gun in the bottom right corner of the screen.
  • Go through the door with the smiling face. Talk to the knitted creature:
    • "Hey, maybe I can fix your back" (you'll receive the Crochet Hook).
    • Back out of the conversation.
  • Return to the Corridor and exit right into the Hallway.
  • Go through the door on the right with the Moon on it. Pass through the room and exit through the Airlock.
  • Use the Compressed Air, Whipped Cream Gun and Knife on Shay. Move upwards to trigger a short cutscene.
  • Head over the antenna before moving to the left of the screen to the Hatch. Use the Knife and Grabbin' Gary on the Hatch.
  • Return to the Hallway. Take the Blue Teleporter up to the Teleporter Hub. Take the Yellow Teleporter down and head through the door on the left into the Core Control Room.
  • Put on the Hazard Suit Helmet and head through the blue shield into the Core Room. Place the Omicron Inhibitor onto the Fusion Orb.
  • Return to the Teleporter Hub, exit to the Fake Control Room pass through the door into the Space Weaver's Room. Give the Prima Doom Space Chart to the Space Weaver.
  • Choose Cozy Cluster. As the Space Weaver initiates his protocols, climb down the ladder and use the Crochet Hook on the Tapestry.

Shay Act 1

  • Return through the vent into Marek's Hub. Talk to Marek to begin the third rescue mission and get the final set of cutscenes for Shay's part.

ACT 1: VELLA

  • Click on Vella to wake her up. Click on Rocky to get a cutscene. Once the cutscene is over, click on Vella's House.
  • Click anywhere in the darkness to trigger the next cutscene. Pick up the Towel. Then pick up a Cupcake from the plate underneath the Towel.
  • Give the Cupcake to Grandpa Beastender. He asks if you want to share the cake so ask "Split it with you?"
  • Pick up the Knife that Grandpa Beastender has just thrown onto the counter. Give the Knife to Mom to trigger another cutscene.
  • Talk to the girl in the green Delish dress to get a cutscene.
  • Talk to the girl in the yellow Fun Size dress. Choose "Just wanted to say GOOD LUCK! Bye!".
  • Talk to the girl in the purple Drink Me dress. Choose "Well, good luck!"
  • Talk to the girl in the red Hot Stuff dress. You'll then get another cutscene.
  • Talk to the girl in the purple Drink Me dress again. Choose "Hey, can I have a drink of that water?" During the cutscene, Vella will receive the Corset.
  • Talk to the girl in the purple Drink Me dress for a third time. Choose "Can I borrow that bottle one more time?" You'll receive the Water.
  • Give the Water to the girl in the yellow Fun Size dress. Then give her the Towel.
  • When the bird re-appears, use the Corset on it. Then use the Knife on Vella's dress to get the next cutscene.
  • Climb down the ladder to the Maidens Feast Area and talk to Twyla. Choose the following conversation options:
    • "I really like your outfit"
    • "Did you say something about shoes?" (you'll receive the Cloud Shoes).
    • Choose "Well, I'll leave you alone." to end the conversation.
  • Use the Cloud Shoes on Vella. Climb back up the ladder to the Central Area of Meriloft then take the path to the Nesting Grounds.
  • Talk to M'ggie. Choose the following conversation options:
    • "What are you doing, exactly?"
    • "How do you get to the eggs in the high nests?"
    • "Hey, can I borrow your ladder?" (you'll receive the Ladder).
    • Back out of the conversation.
  • Walk past M'ggie and use the Ladder on the high nest to the right. Grab the Knife that is sitting in the nest.
  • Head back to the Central Area. Talk to C'rol. Choose "Well, I'll let you get back to your work..."
  • Give the Knife to C'rol. She'll give Vella a pair of Large Cloud Shoes. Use the Large Cloud Shoes on the Ladder.
  • Go through the Nesting Grounds to the Rear Nesting Grounds. Use the Ladder on the nest with the gold egg. Once Vella has scared away the bird, pick up the Gold Egg.
  • Return to the Central Area. Use the Ladder on Jessie's Nest and then head over to the Giant Fruit Tree.
  • Fall through the hole in the cloud that is above the path to the right of the tree. You'll get another cutscene.
  • Shake the tree branch, then fall through the cloud by the tree trunk. Walk along the left branch and pick up the Peach.
  • Walk along the right branch and pick up Jessie's Egg.
  • Enter the hole in the tree's trunk and climb back up to the cloud. Head back to the Central Area.
  • Give Jessie's Egg back to Jessie. Pick up the Gold Egg that Jessie has now cast aside.
  • Walk over to the Offering Area. Place a Gold Egg into one of the offering baskets before climbing up the ladder. Talk to Brother Lightbeard and choose the following conversation options:
    • "Hi!"
    • "Can you help me kill Mog Chothra?"
    • "Hey, are you done with that golden egg?"
    • "Who are you?"
    • "Thanks for the help! See you later!"
  • Pick up the Gold Egg that Brother Lightbeard dropped. Place the two Gold Eggs into the remaining two offering baskets and then climb up the ladder to get a cutscene.
  • In Curtis' House, inspect the stained glass window and catch the Stained Glass that falls out of it.
  • Walk down the stairs. Take the Axe from the wall by the door. Inspect the Art above the fireplace and then talk to Curtis. Choose the following conversation options:
    • "What's the matter with you?"
    • "Hey, about this art."
    • "What is it?"
    • "Where'd you get it?"
    • "I like how it matches your decor."
    • "Catch ya later, Curtis."
  • Take the Art off the wall. Exit the house through the door on the right and walk through the Woods to Shellmound.
  • Pick up the Driftwood from the beach. Talk to the Mayor and choose the following conversation options:
    • "Because you look like a Mayor!"
    • "Hey, about your bucket hat..."
    • "It looks great on you! Very fancy!" (you'll receive the Bucket)
    • "Better let you get back to the Feast!"
  • Return to Curtis' House and give the Driftwood to Curtis. He'll create a Stool out of the wood, which he will then gift to Vella. Exit his house and go back through the Woods to the Talking Tree.
  • Use the Axe on the Talking Tree. Back out of the conversation. Hang the Bucket on the branch that is supposed to be his nose. Then show the Stool to the tree. This gives Vella a Bucket of Sap.
  • Head back into Shellmound. Give the Bucket of Sap to the Mayor.
  • Walk to the right past the Maidens, head up the steps and talk to the Dead Eye God's Bodyguards. Choose the following conversation options:
    • "Hey, can I get you guys something?"
    • "Some more holy tear gas?" (you'll get the Tear Gas Gun).
    • "Can I go inside?"
    • "Because you guys are guarding it. So it must be cool."
    • Back out of the conversation.
  • Show the Peach to the Bodyguards. Enter the cave.
  • Use the Art on the art-shaped hole to the right of the cave. After the cutscene, back out of the conversation.
  • Look at the multi-coloured amplifying quartz so that it smashes on the floor. Grab the Laser Coil and put it into the other slot. Put the Stained Glass into the now empty slot. During the cutscene, Vella will get the Detonator for the Death Ray and head back into Shellmound.
  • Fill the Tear Gas Gun with Chum and spray the maidens with it. Grab the Perfume bottle and use it on Vella.
  • Talk to the Mayor again and tell him "I need to enter the Maidens Feast!" You'll get a cutscene.
  • Use the Detonator on Mog Chothra to burn them off three of his four legs.
  • Use the Ladder on his mouth to force it open. When he drops Vella, use the Detonator again and aim at his mouth.
  • You'll get a couple of cutscenes immediately following the battle with Mog Chothra that can be skipped. However, the cutscene that begins when Vella wakes up on the beach is *NOT SKIPPABLE*, so you'll have to watch this one. You'll regain control when you are asked to pick a character again. Pick Shay.
  • If you are creating a manual save for the start of each part of the act, do not make a save file until after you have spoken to Shay's Dad. Otherwise you will have to watch the last cutscene again and it will add 2 minutes to your time.

ACT 2: SHAY

  • Once you have control of Shay, click twice on Shay's Dad to skip the cutscene. Over the next four conversation prompts, pick any of the conversation options to get a cutscene. Head left to leave the crash site.
  • In Shellmound, pick up the Broken Hexipal. Walk up the steps and enter Alex's Ship.
  • After the cutscene, exhaust all of the conversation options with Alex. You'll get the Hypercam Schematic.
  • Walk back through Shellmound and across the bridge. Walk past the Talking Tree to reach the Woods outside Curtis' House.
  • Go all the way to the left of the screen to be attacked by the snake. *DO NOT SKIP THE CUTSCENE*. Once the Snake has exhausted itself, pick it up.
  • Click on the mailbox that is outside Curtis' House. You'll take a Flyer out of the mailbox.
  • Head into Curtis' House. Choose the following conversation options:
    • "Space"
    • "What are you making there?"
    • "What are you forging?"
    • "What is it?"
    • Back out of the conversation.
  • Go up the ladder to the Offering Area. Talk to F'ther to get a cutscene.
  • Climb the ladder up to Lightbeard's cloud. While on the ladder, talk to F'ther again. Choose the following conversation options:
    • "Can you untie that bow on Harm'ny's cloud?"
    • "Because it's in the way of us saving him!" *DO NOT SKIP THIS CONVERSATION OPTION* F'ther will describe the knot and you need to make a note of the knot's image. As soon as you see the knot's image, you can skip the rest of the conversation option.
    • "Hm, sounds bad. I'd better go find a knot expert for advice."
  • Go past F'ther into the Central Area and head out to the Nesting Grounds. Talk to Rocky and M'ggie. Choose the following conversation options:
    • "I want a cupcake!"
    • "How about a trade? I could give you something."
    • "Well, bye! Good luck with the bake sale!"
  • Walk out to the Rear Nesting Grounds and talk to Grandpa Beastender and Ch't. Choose the following conversation options:
    • "Do you guys know any place here to get some money?" (you'll get the Coin).
    • Back out of the conversation.
  • Return to the Nesting Grounds and give the Coin to Rocky and M'ggie to pay for a Cupcake.
  • Return to the Central Area. Use the Cupcake on Vella's Dad and Walt'r. Walt'r will lick off the frosting.
  • Go back to the Rear Nesting Grounds. Use the Cupcake on Grandpa Beastender, who will frost it before giving Shay his Cane for refilling.
  • Return to the Central Area and head out to the Giant Fruit Tree. Fall down the Tree's trunk. Walk along the left branch and pick up a Peach.
  • Talk to Gus. Choose the following conversation options:
    • "What's that thing you're sticking in the fruit?"
    • "Hey, can I borrow that little fruit tapper?"
    • "I'll let you get back to your juice."
  • Climb back up the tree trunk. Talk to the Dead Eye God's Bodyguards and choose the following conversation options:
    • "If you give me back those robes, I promise Alex won't press charges."
    • "I'll fight you for those robes, no problem. I need them to help my mom."
    • "I'll be back."
  • Use the Cane on the Dead Eye God's Bodyguards. Pick up the Robes that they have dropped and leave this area.
  • Return to Jessie's nest. Use the Fruit Tapper on Jessie's Egg. Pick up the Eggshells from the bottom of Jessie's nest.
  • Climb down the ladder to the Maidens Feast Area. Talk to Twyla and Vella's Mom and choose the following conversation options:
    • "What were you guys talking about when I walked up?"
    • "Maybe he tried to get you, but something came up."
    • "Swinging!"
    • "Well, at least your costume is cool."
    • "Do you think you could make me a costume?"
  • Give the Robes and the Baby Radiation Suit to Twyla. She'll give you the Radiation Suit.
  • Return to Shellmound. Talk to C'rol and choose the following conversation options:
    • "You seem good with your hands. Know anything about KNOTS?"
    • You now need to choose which of the four replies looks most like your knot. The knot images are here
  • Use the Snake on the Mayor, who will cough up a Flute. Give the Schematic to him and tell him that "I think sand is the perfect material for making spaceship parts!" He will give Shay the Hypercam Sand Model.
  • Talk to Shay's Dad. Choose "What's cookin'?" before backing out of the conversation.
  • Use the Spoon on the Chum to find out its pH reading. *DO NOT SKIP THE CUTSCENE UNTIL YOU KNOW THE PH LEVEL OF THE CHUM* Add the Eggshell and the Peach to the Chum as many times as necessary to change the Chum's pH reading to 7.
  • Use the Spoon on the Chum again to check that its pH reading is 7. During the following cutscene, you'll be taken back to Alex's Ship.
  • Give Alex the Radiation Suit. Talk to him and choose these conversation options:
    • "Can I borrow your space pencil?" (you'll receive the Pencil)
    • "Okay, see you later!"
  • Return to Shellmound. Give the Pencil to C'rol. She will draw a Knot Diagram for you.
  • Head back to the Talking Tree. Put the Hypercam Sand Model on the barf spot in front of the tree. Show the Flyer to the tree. He will barf over the Hypercam Sand Model so that you are left with the Hypercam Mold.
  • Go to Curtis' House and give the Hypercam Mold to Curtis, who will create a Superconductive Gyroscopic Hypercam.
  • Return to the Offering Area. Climb the ladder to Lightbeard's cloud. While on the ladder, talk to F'ther again:
    • "Let's give that knot another try, okay?"
    • You will then see your Knot Diagram with three pictures. You need to describe these pictures in order to untie the knot. The knot images are here
  • During the following cutscene, F'ther helps you to deliver the Hypergravity Thruster back to Alex's Ship. Give him the Superconductive Gyroscopic Hypercam too.
  • Return to the Talking Tree. Choose these options:
    • "Don't worry. I've seen much weirder stuff than talking trees where I'm from."
    • "I understand why you're so mad."
    • "That fish up there in your branches... can I have it?"
    • "Oh come on. You don't need that fish."
    • "Hey, want to hear a joke?"
    • You then need to tell the tree one of three jokes.
  • Pick up the Talking Fish and return to Shellmound.
  • Give the Talking Fish and the Crochet Hook to C'rol. Choose "But please promise to leave SOME fish in the ocean for future generations." and you will receive the Wire.
  • Combine the Wire with the Broken Hexipal. Head back to Alex's Ship.
  • *MAKE A MANUAL SAVE*. Wire up the Hexipal and put it into the Charging Dock so that you can see what symbol is represented by each terminal.
  • Reload your save file. Rewire the Hexipal so that it matches the wiring in Shay's family photograph and then place it into the Charging Dock. If you get it wrong, reload the save again.

Shay Act 2

  • Give the Hexipal to Alex.
  • Press I and switch to Vella.

ACT 2: VELLA

  • Click anywhere around Vella to wake her up. Talk to the Knife and exhaust all conversation options. After this, the Knife will be added to Vella's inventory.
  • Exit to the right. Grab the Helmet from the fissure in the wall. Use the Knife on the pipe that is dangling from the top doorway to get a short piece of Hose. Use the Hose to connect two of the steaming pipes so that the middle hexagonal section of the wall is extended.
  • Climb up the dangling pipe and use the Knife at the top of the pipe. Vella will now be left with a longer section of Hose. Use this new section of Hose to connect one of the pipes on the left to one of the pipes on the right to get a cutscene.
  • Use the Helmet to lure the Grabbing Hand towards Vella. Use the Grabbing Hand to grab the Boot that is floating to Vella's right. Use the Hand + Boot to attract Vella towards the robotic hand. Once she is attached to the hand, push off towards the open airlock.
  • Walk left through the Escape Corridor, through the Hallway and through the Right Corridor until you reach an obstacle. Move the obstacle out of the way.
  • Continue along the corridor into the Fake Control Room. Walk around the fake controls and into the Left Corridor. Enter Shay's Room and go through the Vent into Marek's Hub. Choose these conversation options:
    • "Can we stop this ship?"
    • "Can you open any of the locked doors on the ship?"
    • Back out of the conversation.
  • Head left through Marek's Hideout and through the vent into the Trophy Room. Enter the Teleporter on the left and travel to the Teleporter Room.
  • Head left out of the Teleporter Room into the Fake Control Room. Return to the Hallway and take the blue teleporter back to the Teleporter Room. Head left to enter the Fake Control Room again and make your way back to the Left Corridor.
  • Click on the door to the real Control Room to talk to Shay's Mom. Exhaust all of the conversation options until you get to:
    • "It's me. Shay."
    • "Mister..."
    • "Huggy."
    • "Please, can we not do this?" This conversation option is *NOT SKIPPABLE*
    • "Purple."
    • "Size 4..."
    • "Polka-dot."
  • In the following cutscene, you'll enter the Control Room and talk to Shay's Mom again. Exhaust all of the conversation options.
  • Pick up the Fork from the salad. Use the Central Control Sphere.
  • Scroll into Shay's Room. Click on the arm to remove the debris from the bed and move inflatable Shay into the Kitchen.
  • Scroll into the Left Corridor. Unlock the Kitchen door.
  • Scroll into the Fake Control Room. Unlock the door to the Space Weaver's Room.
  • Scroll into the Right Corridor. Unlock the door into the Avalanche Mission Room.
  • Scroll into the Hallway. Unlock the door to the Runaway Train Mission Room. Now lure the Hexigal back to the Control Room door.
  • After the Hexigal suffers its accident, scroll into the Kitchen. Click on the sad face until the display reads Taco Pill Tuesday. Click on the arm icon to pluck the Hexigal back into the Kitchen.
  • Click on the lightning symbol by Vella's face to lure the Hexipal into the corridor again. Click on the display until it reads Good Morning! Use the arm icon to lower the arm and get a cutscene. Click on the arm to lower it again and pause it at its lowest point.
  • Scroll back into the Left Corridor. Lure the Hexipal over to the Control Room door to get several cutscenes.
  • Leave the Central Control Sphere and enter the Kitchen. Pick up Inflatable Shay.
  • Go through the Fake Control Room and into the Right Corridor. Enter the Avalanche Room.
  • Use the Cloud Shoes on Vella, then use the Helmet on the Icecream Dump Truck to get the Bowl of Icecream. Fill Inflatable Shay using the Whipped Cream Gun.
  • Go back into the Right Corridor. After you pass it by, move the Obstacle so that it is blocking the Corridor again.
  • Enter the Hallway and then the Runaway Train Room. Show Inflatable Shay to the Knitted Creatures. Once you have rescued the Knitted Creatures, let them perform the Wave. You will be left with a pile of Yarn. Combine the Yarn with the Fork to make a Spool.
  • Take the Blue Teleporter to the Teleporter Hub. Take the Yellow Teleporter and walk through to the Core Room. Use the Bowl of Icecream on the Fusion Orb to create the Bomb.
  • Return to the Kitchen through the Teleporter Hub, Fake Control Room and Left Corridor. Rattle the box of cereal that is hanging from the Robotic Arm to get a cutscene.
  • Follow the Hexipal into the Fake Control Room, but then head into the Teleporter Room. Take the Blue Teleporter.
  • Quickly use the Trash Chute to stop the Hexipal from closing it. It will throw a box of Cereal at you. Put the Bomb into the Trash Chute.
  • Take the Blue Teleporter again. Take the Red Teleporter down to the Trophy Room. Go through the vent into Marek's Hideout. Inspect the Electrical Panel to the right of the door. You can now talk to the Maidens through the door:
    • "I'm going to get you out of there!"
    • "Hey, I've got some cereal here. Do you want some?"
  • Give some of the Cereal to the maidens. As they are trying to hook the cereal under the door, grab the Hook from them. Click on the panel at the side of the door again to set off an alarm.
  • Go back to Shay's Room via the Trophy Room, Teleporter Hub, Fake Control Room and Left Corridor. Crawl through the vent into Marek's Hub. Use Marek's Terminal so that the door is locked. Pick up the Star Chart.
  • Return to the Fake Control Room and enter the Space Weaver's Room. Give the Spool and the Star Chart to the Space Weaver.
  • As the Space Weaver prepares to transport the Ship, climb down the ladder so that you can see the Tapestry. Use the Hook to alter the Tapestry so that it shows the pattern indicated by the Return command. If you do this quickly enough, you can leave the room before the Space Weaver has finished initiating the sequence.

Vella Act 2

  • Return to the Control Room to get a series of cutscenes.

FINALE

  • Click on the ship on the right to take control of Vella first. Leave the Control Room and head along the Left Corridor. Pick up the Hexipal that is underneath the debris that was blocking the hole.
  • Enter the Fake Control Room. Use the Detonator on the other ship that you can see through the window.
  • Enter Shay's Room and go down the Vent into Marek's Hub. Pick up the piece of Wire that is sitting on Marek's computer. This will trigger a conversation with the Boss.
    • "He hasn't landed yet?"
    • Back out of the conversation.
  • Combine the Wire and the Hexipal. Make a note of the burn pattern on the back but, instead, wire it up to match the harp playing pattern.

Finale

  • Go back through Shay's Room, Left Corridor, the Fake Control Room and into the Star Weaver's Room.
  • Climb down the ladder. Use the Hexipal with the tapestry.
  • Return to the Fake Control Room. Press I and switch to Shay.
  • Go through the door behind Alex and climb down the ladder. Go into the Music Room. Pick up the Broken Radio.
  • Climb back up the ladder to the Control Room. Show the Broken Radio to the Hexipal, who will fix the radio and accompany Shay. Give the Radio to Alex.
  • Go back through the door behind Alex and climb down the ladder. This time, try to go through the door on the left for a cutscene.
  • Head through the door again. Show the Hexipal to the group of Hexipals.
  • Head back into the Music Room and walk up to the harp. Wire the Hexipal to the harp playing pattern and use it on the harp.
  • Go through the left door into the Power Room again. Inspect the switch on the wall and pick up an old Mallet.
  • Follow the path past the switch and around to the other side to turn the real power switch back on.
  • Go into the Music Room. Combine the Hexipal and the Mallet. Rewire the Hexipal to the burnt wire pattern. Use the Hexipal with the drum for a cutscene.
  • Leave the room and climb back up to the Control Room. Use the Grabbin Gary Remote. Press I and switch back to Vella.
  • Use the Detonator for the final series of cutscenes.

If you have managed to complete the story within 60 minutes, you'll get the following achievement:

Of course, if you also grabbed all of the achievements that we listed in the story walkthrough, you'll also get this:

  • 3.3

    Unlock all Broken Age Achievements

    3.3
    Offline Mode - These achievements require play in game modes that do not necessitate a connection to any online services.Single Player - These achievements can be obtained by a single player.Collectable - These achievements are obtained by exploring the game environment to find a set of unique objects.Missable - These achievements can be missed.

Congratulations on finishing the adventures of Shay and Vella and getting your latest completion!

Find anything you think is wrong with this walkthrough? Help us fix it by posting in its Walkthrough Thread.
This walkthrough is the property of TrueSteamAchievements.com. This walkthrough and any content included may not be reproduced without written permission. TrueSteamAchievements.com and its users have no affiliation with any of this game's creators or copyright holders and any trademarks used herein belong to their respective owners.